Happy April everybody ! It's an auspicious month for me, with both my birthday and wedding anniversary to celebrate. As if that's not enough, it's also time for a new challenge over at the
Stamps and Stencils blog. Our fabulous host this month is Branka, and her theme is 'Lucky Star'. This is what she has to say .......
'For this challenge I would love to see a mixed media project that has star/s in it somewhere. You can create anything you like as long as you include a star. Don't forget to use stamps or stencils or both! Can't wait to see your creations'
I think you'll agree that Branka has given us plenty of creative scope with this challenge. You can see her gorgeous work, along with some fabulous projects by
the rest of the team, over on the
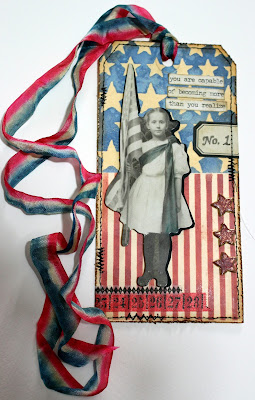
Stamps and Stencils blog. My project for this month is a tag using some of my new crafty goodies. I don't know about you guys , but I've really missed Tim Holtz's 12 Tags Challenge. Creating this tag in a Tim Holtz style, has helped me with my withdrawal symptoms !
I started by masking off the bottom of the tag and used Tim's 'Stars Layering Stencil' with Versa Mark clear ink, to add stars to the top half of the tag. I then used clear embossing powder and my heat gun to activate it. I used a piece of tape to cover the last row of stars, and stenciled red stripes using Distress Oxide, with a Wendy Vecchi stencil.

The tape helped to keep a crisp break between the stars and stripes. I then moved the tape down in order to cover the top part of the stripes, and used Faded Jeans, Distress Oxide, with a blending tool, to add a blue background to the stars. I gave just the top half of the tag, a little spritz with water in order to create some texture and gently wiped the ink from the surface of the stars. I removed the masking tape, and dried the tag with my heat tool. I then covered the tag with a piece of printer paper and iron the surface to melt and remove the embossing. This is best done several times moving the paper to a clean area each time until all the shiny embossing has gone. I really like the effect this technique creates.

The picture of the little girl, is from Tim Holtz's new Paper Dolls. I love them! the packet seems very good value as there are loads to choose from in several different sizes. I gave this one a half shadow by 'half mounting' the figure on black card, before fussy cutting the edge. I then used dimensional pads to secure her to the tag. In true Tim style, I added some paper and metal embellishments, a sentiment and a machined stitched border. To complete the tag, I finished off with a length of seam binding, which I had coloured, by running red and blue Distress Markers, along each side. It was great fun to make and I'm sure I'll always enjoy making tags in a Tim Holtz style! Well it's over to you now. If you'd like to join in with our challenge, hop along to the
Stamps and Stencils blog where you'll find all the details of how to get involved.


