Thursday 31 January 2013

Steam Punk Upcycled Box


This is a box I've recently finished that will house my creative journey projects for 2013. It's quite big so I can get plenty of tags and cards in there! It started life containing some yummy bath products that my brother bought me for Christmas. I was as excited about the box as I was for it's contents!
Here is the inside of the box, it is actually a rather nice plum colour, so I've only covered the inside of the lid where there was some writing.

Here is the original box before I covered it with embossed metal foil tape. It was very easy to cover with sticky backed strips of tape, which I ran through my Cuttlebug first, using Tim Holtz's Riveted Metal Texture Fades embossing folder. I placed a thin piece of card under each piece of tape before putting it through the machine. This stopped it from being too deeply embossed and prevented the foil from ripping when the backing paper was removed.
Once I'd completely covered the box, I applied alcohol inks in black, ginger and gold.
I then 'sanded' the surface with wire wool to remove some of the ink and reveal a kind of aged metal surface. This is fast becoming  one of my favourite techniques. The little handle was bought from a company called Sky Blue and Pink. I love it.
I cut out the cogs from thin copper using the Tim Holtz cogs die. I heated the copper with a cooks blow torch to age the surface. I then stuck these onto chip board cogs cut from the same die. The wings were from a set of 'Art Parts' I bought from the Artful Splodger when they were having a sale. They've been embossed with Stampendous frantage, sanded and distressed with Black Soot DI.
The corner pieces are grunge paper circles that have been given a rust treatment with Vintage photo distress embossing powder mixed with a little gold frantage. The studs around the edges are actually the tops off paper fasteners. I cut the butterfly bits off and stuck the heads on using a glue gun. I've really loved 'upcycling' this box and I'm sure I am going to enjoy using it. I am going to enter this into the Happy Daze ' Recycle it' challenge and also the Eclectic Paperie challenge which is 'Altered Boxes'. Just got word of another challenge I can enter my box into, it's the Frillie and Funkie 'Spruce it Up', I think that just about sums up what I've done with this. x

Wednesday 30 January 2013

WOYWW #191 and a Spot of Shameless Self Promotion!


Good morning to all you desk snoopers, no I'm not being unkind, if you want to know why I'm saying this pop over to Julia's Stamping Ground blog and check out her wonderful WOYWW, or What's On Your Workdesk Wednesday and you too can have a snoop at other crafter's work spaces from all over the world. If you've found yourself here, have a nose at my desk, In the foreground you can see my new ipad stand bought for £1 at Walsall market!(much sturdier than it looks) and then scroll down to my flower making tutorial, you could be in with a chance of winning a selection of the flowers I have made, or have a go at making your own. They're easy to do and only take a few minutes. Happy WOYWW everyone.x

Step by Step Paper Flowers and a Bloomin' Giveaway!

Well as promised this is the step by step guide to making the paper flowers some of you saw on my desk last week. It's a bit long so you may want to grab a cuppa and get comfortable. So let's go!
You will need some fairly light weight card some punched or die cut flowers, water mister, distress inks of choice, a 'pokey tool', tweezers and some tiny brads. Each of the flowers I've made have 8 layers. For this tutorial I've used the 'middle sized' flower from Tim Holtz Tattered Florals die. You will also need a craft mat and a cutting mat, or similar surfaces.
Take eight flowers and use a blending tool to colour each one on both sides. Spray with water and leave for a couple of minutes so that the water absorbs into the card.
Then squash each flower shape between your fingers to form a sort of conical shape. slightly screwing each one up
Be careful not to rip the petals as the card will be fairly damp. Leave them for a couple of minutes for the creases to set. 
Now get your brads, pokey tool, tweezers and cutting mat at the ready. Gently open each flower shape and place one on top of the other rotating each layer so that they are not all in a uniform stack.
Using your pokey tool, make a hole through the middle of the layers, watch your fingers! hold the flowers together and secure with a small brad.
Now, using your tweezers, gather up the top layer of petals, and squeeze them together quite tightly. Repeat with each layer until you have what looks a bit like a flower bud.
At this stage, I like to mist the flower bud with a little water and gently dab across the edges of the petals with a little distress ink. once you get the hang of this you can experiment with the colours you use.
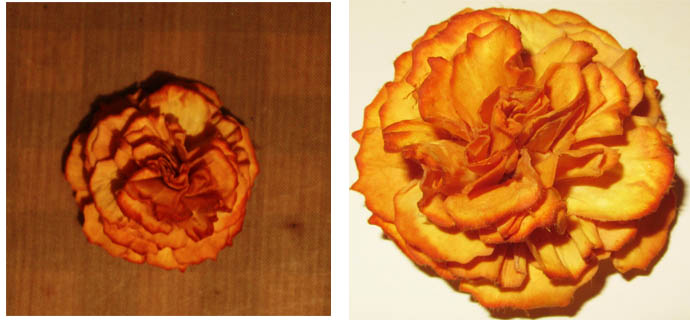
Finally, place your flower bud on your craft sheet and gently open each layer starting from the bottom and working your way up each layer. Leave the centre more tightly closed and the brad will not be visible. There you have it, a gorgeous vintage style flower. Leave it to dry thoroughly before using.
Hope you've enjoyed my first step by step, by way of a reward for those that have made it to the end of this post, leave a comment letting me know what you think and I will have a random draw on Sunday to win a selection of the flowers I have made. Thanks 'pinkaboo6691' whose video on youtube got me started and to my lovely son Max for his help with the photos x

Saturday 26 January 2013

Her Journey.


Here is a large tag I've made using an image from one of my favourite but under used stamp sets. This rather beautiful lady is from The Stampsmith African American Heritage collection. I've stamped her in black Archival ink then tinted with Distress Markers and Distress ink pads. I then covered the image with Versa Mark ink and applied clear embossing powder. I bent the corners cracking the embossed surface, which has given it the look of an aged photo. The collection of  'ephemera' has been stamped with a variety of stamps from my collection. The train is from an Indigo Blue set. It's been stamped with black Archival and clear embossed. I've mounted it on dimensional pads to create a bit of depth. I think there are several stories that could be told with this tag, I'll leave it to the viewer to decide. I am going to enter this into both the Fashionable Stamping Challenges, 'Trains, Planes and Automobiles' and the Simon Says Stamp and Show, 'What are You Known For'. My work usually has  a vintage look with a bit of grunge and some colour thrown in for good measure. I love colour whether it's subtle or bright. I hope I've captured some of that in this piece. Oh and at work I'm known for my 'good' ideas. I hope some of that rubs off in my art ! x

Wednesday 23 January 2013

WOYWW #190 Brrrrrrrr!


There's nothing we Brits' like better than to talk about the weather and boy, we've had a lot to talk about this week ! The first real snow we've had this year, has brought about the usual chaos. On the plus side, I've had an extra afternoon of crafty pursuits, the downside is that my crafty attic is very cold so I've been wearing umpteen layers of woollies, but the hands still get cold after a while. So what's this post about? it's Wednesday, so that means it's time for another What's on Your Wordesk Wednesday post. Go and have a look at Julia's Stamping Ground Blog and find out how you too, can show the world your crafty workspace. Believe it or not my work table is pretty tidy, I was forced to tidy up after I lost one of a pair of little chipboard wings I had been working on. I spent ages looking for it and of course, found it after I had used another one. So what else has been going on? I've made a few more blending tools to use with the Seasonal Distress Inks from last year. That's my growing collection  in the red tray, they are actually wooden drawer knobs with circles of Cut and Dry foam stuck to them.. I've also been really enjoying making some more paper flowers, I showed a couple last week but these are slightly different. I'm recruiting my son to help photograph a step by step, which hopefully I will post soon. Oh and there's my pink ATG, which you can blame Julia for, she said in her last WOYWW that they were on special offer on the Scotch website, I just had to.... well didn't I ? x

Wednesday 16 January 2013

WOYWW #189 The Ever Decreasing Work Space !


Wednesday already? That means it's time for another Whats On Your Work desk Wednesday. If you don't yet know what that's all about, hop over to Julia's Stamping Ground Blog and you'll soon want to join in. I've still got a bit of space on my table this week, there's a label I've made for a project which is out of view at the moment. I hope to post that fairly soon so you can see what I've been up to. There's also a couple of paper flowers I made after watching a you tube tutorial the other night. There are loads of flower making videos out there using all sorts of materials, so if you're into making flowers and you've got some time to while away, I highly recommend taking a look. I've got this one bookmarked if anyone wants to know. Have a good crafty rest of week, those in the UK stay warm and safe, it seems like winter has finally arrived. x

Thursday 10 January 2013

Twelve Tags of 2013 January


I'm so pleased that Mr Holtz is continuing with the Twelve tags Challenge this year. It's a great pleasure to join in each month and share his creative expertise. I love this first tag.What can be better for a fan of all things vintage, grunge and Steampunk, than a tag chock full of cogs, clocks and distress. add in one of may favourite quotes and I'm in 7th heaven. Thank you Tim for a great start to The Twelve Tags of 2013 .x

Wednesday 9 January 2013

WOYWW #188 Good to be Back.


Well here I am, back after a brief absence from the fabulous 'What's on Your Work-desk Wednesday,' hosted by the lovely Julia over at her Stamping Ground blog. I've really missed not joining in for the last few weeks so it's good to be back. It's a great way of meeting and introducing yourself to fellow like minded crafters. This is my desk after a brief crafty session spent making my January tag for the Twelve Tags Challenge. There's the usual pile of Distress inks and a few embellishments. You may spy some rather interesting stamps which were free with a magazine. Who doesn't love free stamps, especially when they are this good. Now cast your eyes to the centre, what can you see? why a space of course, just about enough room for another session! Happy WOYWW everyone x

Tuesday 8 January 2013

12 Tags of 2012 Finished.


Well here they are, my completed set of tags for the Tim Holtz 'Twelve Tags Of 2012 Challenge'. It has been a brilliant challenge and I've thoroughly enjoyed making each tag. The Great news is that Tim is going to continue the challenge for this year. If you didn't manage to join in last time, I recommend that you get on board for 2013.  It's great fun looking forward to each months tag and a great opportunity to learn new skills and use up some of the fabulous stash we crafters like to hoard! You don't have to have all of the supplies, the name of the game is creativity, so just put your thinking cap on and improvise. Hop over to Tim's blog where you can find the new January tag. It's gorgeous. x

Thursday 3 January 2013

'Happy Birthday Tim' Studio L3 Final CC2 Challenge.


Happy New Year fellow bloggers ! Well this is my first post of 2013 and what fitting way to start the year than with a little tribute to Tim. Linda over at Studio L3, has done a fantastic job of hosting the Compendium of Curiosities Volume 2 challenges, which have taken us all on a fabulous creative journey through the book. She has never faltered in producing brilliant works of art, that have been a weekly inspiration and have made me want to dive head first into the book. THANK YOU Linda!
Now the final challenge is to make a birthday card for Tim using any of his techniques. I've gone back to basics with this card with some plain and simple stamp, emboss and distress. I've used the 3 gentlemen as it is one of the first Tim stamps I bought and is instantly recognisable as being one of the master's. I've also used my favourite 'sunray' stamp from the Tim Holtz Bitty Grunge Collection.  I've composed a little ditty for the inside, ok, ok, all you writers out there, I'm not a poet but I think you'll all know what I mean. I'd like to send this to Tim although coming from the UK it may be a little late. So thanks again to Linda and Happy Birthday Tim! x

PS. I almost forgot to mention that there are some totally fab prizes to be won supplied by Linda and Mario x