Thursday 6 December 2018

It's got to be Christmas ~ Stamps and Stencils ~ New Challenge.

Hi everybody! It's time for our final challenge over on the Stamps and Stencils blog. Not only is this the last challenge of the year, sadly, it will also be the last challenge for our fabulous Stamps and Stencils blog. It has been going for a fantastic 3 years and we have had a blast, setting some great challenges and delivering  brilliant inspirational posts. I'd like to take this opportunity to say a big thankyou to Sue for having the vision, leading a great design team and running the blog alongside her very busy life. She has done a great job! I'd also like to thank my fellow teamies for all their support and fantastic inspiration. Finally, I'd like to say thank you to all the talented people that have joined in with our challenges and left us uplifting comments. We've seen some incredible work and it's always been difficult to choose our winners!
The challenge for December has been set by Sue and is, of course, it's a seasonal one. We'd like to see what you've been stamping and stenciling for Christmas. this is what Sue has to say about the challenge...….
It's got to be Christmas! Possibly predictive but as everyone gets busy for the festive season time seems to disappear at a fast pace, so we're keeping it simple . For this challenge we want to keep it festive and see your Christmas themed creations, just remember it must be mixed media and include stamping and/or stencilling.
My project is a  Christmas decoration based on an MDF 3 part bauble shape from Tando Creative. I was lucky enough to attend the Ministry of Mixology event a couple of weeks ago and as well as doing some fabulous workshops with Andy Skinner and Birgit Koopsen, I also was able to participate in some fabulous 'make and takes' during the evening. My project is inspired by one of these which was run by the lovely  Fiona Randall. This is how I put together my interpretation, using of some of her ideas and techniques...…..
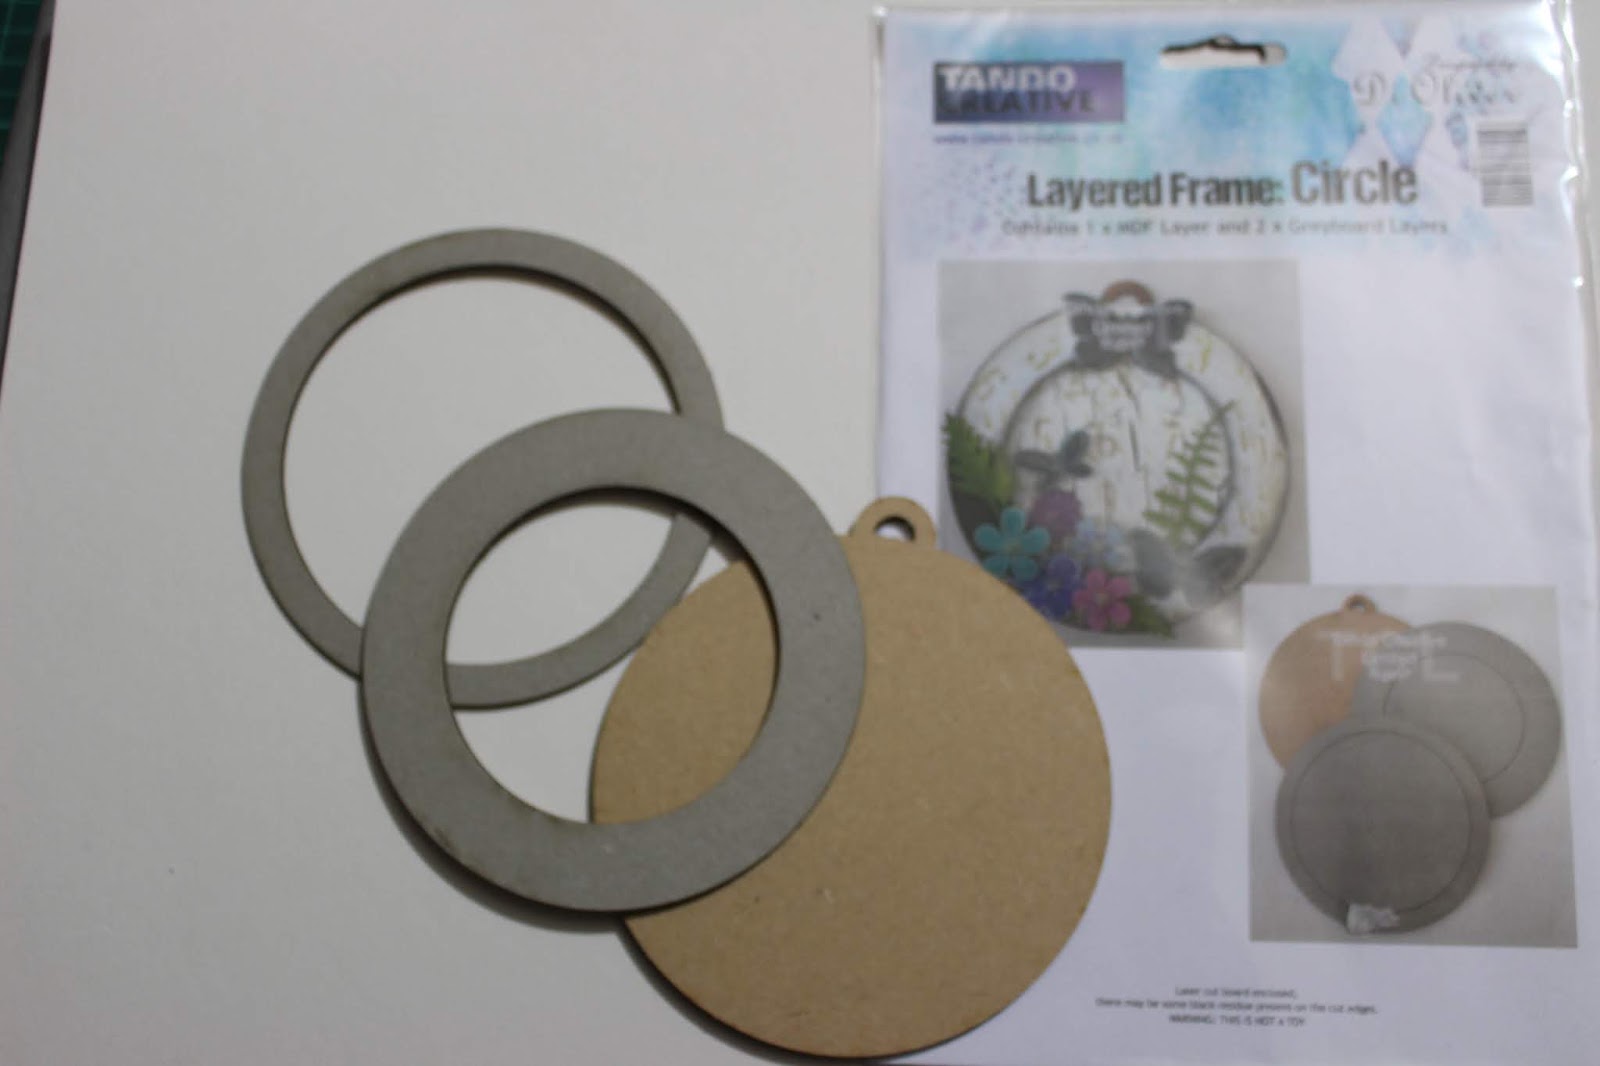
Instead of using a tag, I used this layered frame kit, which of course I just had to buy from Di Oliver's pop up shop at the workshop venue...…
I painted the pieces with black gesso and then applied a coat of Deco Art Americana Crackle medium. once this was dry I applied a top coat of Snow White, mixed with a little Buff coloured Fresco Finish paint this is how the two layers looked once the crackles appeared...……


 I then stamped with a script stamp around the top frame, and added a little shading to the edges with Archival ink, and painted the sides with gold paint, allowing it to cover a little of the edges of the frame.....
I then mixed a little texture paint with fine glitter, and stencilled the back of the frame using a 'splatter' stencil. Here's a close up...….
I then glued the two pieces together and turned my attention to the centre piece.....
After painting a chipboard snowflake with black gesso, I dried it with a heat tool and then brushed a little Vaselineto some of the edges. I then applied  Texture Sand Paste, using my finger to dab the surface and create a 'fluffy' texture. I then painted it with Snow White paint and I dried it with a heat tool. I then wiped the edges with a soft cloth, removing some of the paint and paste.....
I then repeated the Texture Paint and glitter stencilling on the surface. I painted a few smaller die cut snowflakes, one gold , one white and one pale blue. Once they were all dry, I stacked them on top of the large snowflake and adhered them together with dimensional tape...…
A piece of dyed seam binding, threaded through the top finished of my bauble, which is now ready to hang up. 
I hope you'll join us for this final  challenge, just hop over to the Stamps and Stencils blog, where you'll find all of the details as well as being able to feast your eyes on some beautiful and inspiring projects by the rest of the amazing design team! Have a happy Christmas and a Peaceful New Year. I shall be continuing with my Artistic Craft Dabbler blog and look forward to sharing my projects and tutorials with you! xx 


Thursday 1 November 2018

Remember, Remember, the 5th of November.......

Hi everybody! it's my turn to set the challenge over on the Stamps and Stencils blog and this is what I've come up with ........

......... As a child, I used to love bonfire night. My dad would come home from work with a box of fireworks and packets of sparklers. We couldn't wait to get outside and enjoy the show! Fire works and fire, are used in celebrations all over the world.  I'd love to see your art works based on fire and fireworks. Think bursts of colour. Let rip with the colour sprays, glitter, and paints. Let's have a bit of fun and brighten up these dark days with COLOUR ! Just remember it must be mixed media and include stamps or stencils or even both.

My project, is a square canvas with a tissue collaged background and stamped and stencilled patterns on top. This is how I brought it together.....
I started off by covering the surface with torn pieces of coloured tissue paper, adhered with Mod Podge. I slightly crinkled the paper as I applied it, so as to add some texture. The next step was to stencil the pattern. I haven't got any specific fire work stencils but I thought this chrysanthemum style, flower stencil, had the look of a rocket burst. I mixed a little acrylic paint into some moulding paste and stencilled the first flower. To add to the look of a firework, I sprinkled the surface of the moulding paste with glitter. I then dried it with a heat gun and repeated the same procedure for each flower.......
    I think the glitter helped to transform my flowers into the desired firework bursts. In order to add another 'firework' element, I stamped several areas of the canvas, with a concentric circle style stamp, using Indigo Blu Flitter Glue. Once this was tacky, I layered on some gold leaf, apologies for the rather blurred picture.......
Once everthing was completely dry, I applied some black Archival Ink to the edges of the canvas, with a blending tool. I also ran the ink lightly across the background surface, just catching some of the tissue crinkles. I added the words 'Remember, remember, 5th November, which were taken from a rhyme we used to say at school which commemorates the foiled plot by 'Guy Fawkes' and his buddies,to blow up the King and Parliament.....

'Remember, remember, the fifth of November
Gunpowder, treason and plot
I see no reason why gunpowder and treason
Should ever be forgot'

......and that is why we still celebrate Bonfire Night to this day.
If you would like to join in with our Stamps and Stencils challenge, I'd love to see your interpretations of fireworks or fire.Hop over to the Stamps and Stencils blog with this link, and you'll find some inspiring work by the rest of this fantastic team, as well as all of the challenge details. Hope I'll see you there ! x

Thursday 4 October 2018

Spooky Fun....With an Autumnal Twist ! ~ Stamps and Stencils ~ New Challenge.

Hi everybody! It's that time again, when a new challenge starts over on the Stamps and Stencils blog. Rachel is our talented host this month and she has chosen a fun, seasonal, challenge. She has called it.... 'Spooky Fun with Autumnal Twist'. I was pleased when I saw Rachel's theme, as it gave me a chance to use some of the Halloween stash, I've been hoarding since last year!
My project is a large tag made from a piece of corrugated card......
I always get a sense of satisfaction when I'm able to use some recycled materials in my crafting. The tag measures around 23 cm x 12cm. I removed some of the surface paper from around the edges and gave the tag a coat of white gesso. Although applying gesso to the surface is a bit of a faff when it's going to be painted further,  it really does provide a good ground for the coloured acrylic paints, making them more true to their colours, than if they were painted straight onto the cardboard. once the gesso had dried, I painted the surface with Decoart, Media Paint in Green Gold. I then used one of Tim Holtz's Layering stencils, with black gesso, to stencil the harlequin pattern.......
I love that Green Gold colour, though for my spooky tag, I felt it looked a little too bright. in order to grunge it up a bit, I gave the surface a little 'dirty wash' and added some faux rusting to the exposed corrugated card.....
I then turned my attention to the main focal image. I Took a piece of  light weight card and sprayed it with Distress Spray.  I used a combination of Marigold and Spiced Pumpkin. I then used my Stamping Platform to stamp the raven image.The stamp is by Stampendous. The advantage of using the Stamping Platform with a stamp such as this, is that you can stamp it several times if the image doesn't come out perfectly first time. I am, of course, speaking from experience, with my first effort ending up in the bin! After stamping out the image, I tore around the edges and scrunched up the card. I then used Distress ink over the surface to highlight the folds, as well as around the edges.....
 As usual the photographs tend to peter out at this stage as I started to have fun with trying different elements to layer with the image. Underneath the focal image I added some die cut 'twigs and die cut, embossed planks of wood.......
I made a little picture frame for the image of Edgar Alan Poe.......
and tucked a fun skeleton image at the top of the tag..........
Both of these die cuts are from a pack of Tim Holtz Ideaology, Halloween Ephemera. The final addition of a dyed ribbon to the top, was the finishing touch.....
So there you have it! Spooky fun...... tick......Autumnal colours..... tick ! Ha ha! If you fancy having a little spooky fun, or if you prefer a project with an Autumnal feel, then why not join us in this months challenge. We would love to see what you come up with. Just hop over to the Stamps and Stencils blog, where you'll see some fabulous inspiration. You'll also find the challenge rules, there aren't many, just remember to use some stamping or stencilling or both ! I look forward to seeing you there. x
I'm also going to join in with the Spookalicious Challenge over on the 'That's Crafty Challenge blog'


Thursday 6 September 2018

Anything Goes ~ Stamps and Stencils ~ New Challenge.

Hi everybody! we have a new challenge for September, over on the Stamps and Stencils blog. Sue is our lovely host and she has chosen an 'Anything Goes' ...... That is as long as it  includes some stamping, stencilling or even both. I took the opportunity to give a first inking to some lovely PaperArtsy,  mushroom stamps which I bought last year. I'm afraid I have too many lovely stamps that have so far, never been inked ! It was, therefore, a joy to get these out of the packet.
I started with a little MDF Stand Up Plaque......
......and the first thing to do was to add some texture. I used some Prima Art Stones and Mini Art Stones, which I adhered to the surface, with a liberal helping of Heavy Body Gel Medium. I also stencilled part of the surface with with modelling paste and coated it with gesso.....
Whilst the plaque was drying, I coloured several small pieces of card, with Distress Inks, in a variety of 'autumnal' colours. Once dry, I Stamped over the surface with a fine crackle design stamp.......
I used the card to diecut a variety of small leaves. I highlighted the leaves with Distress Ink and folded and curled them.......
I also stamped and coloured the two mushrooms and little snail. Once I'd coloured and cut them out, I heat embossed them using Seth Apter's Vintage Beeswax embossing powder. Unfortunately I didn't take any photos of the process, so here's a close up instead. The embossing powder added a lot of depth to the colours as well as a really nice sheen......
I must say I really like the way they turned out.  My next job was to add some colour to the plaque. I used Dylusions Sprays in the colours ,Ground Coffee and Dirty Martini. I let the sprays drip and run over the surface.......
Once the plaque was dry, I assembled all of the elements using dimensional tape and glue where needed. 
I also added some dyed sisal fibres to the base of the plaque, and a paper covered wire branch at the top. I ummed and ahhhed, about whether or not to add a title or sentiment, but decided that there was probably more than enough going on.So that was it, my 'Anything goes', Autumn forest floor project was finished! If you have a mixed media project on the go, that has some stamping or stenciling or both on it, we'd love you to share it with us over at Stamps and Stencils. You'll find a feast of inspiration from Sue and the rest of the design team over on the blog. just click on this link . I look forward to seeing you there. x
I am also going to share this project with the 'Forever Autumn' Challenge over on the That's Crafty blog

Thursday 9 August 2018

Inspiration Post ~ Stamps and Stencils ~ Stamp and Emboss Metal Embellishments

Hi everybody ! I have an Inspiration Post over on the Stamps and Stencils blog. I've been making some fun embellishments using my old favourite tomato paste tubes. I never throw them away, I just cut the finished tube open, wash it and smooth it out. I then have an almost endless supply of lovely pliable metal, which can be easily cut, coloured and embossed. This is what I've been making with them this week.......
If you'd like to find out how to make these little critters then hop over to the Stamps and Stencils blog and you'll find out just how easy it is. If you haven't got a tomato paste tube, then don't despair as you can use the same technique with any soft craft metal. Here's a peek at what I've done with a piece of copper sheet.......
Here's another little snippet from my post......
Why not grab a cuppa and head over to the Stamps and Stencils Blog with this link. I'd love to know what you think. x

Thursday 2 August 2018

Industrial/Grungy ~ Stamps and stencils ~ New Challenge

Hi everybody! The months are racing away and I'm finding it hard to believe that it's August already!
The first day of the month, however, heralds a new challenge from our fabulous Stamps and Stencils blog. Cec is our talented host and she has chosen a great topic, one that is very close to my heart, Industrial/Grungy. This is what Cec has to say........
Create a mixed media project with some stamping and/or stenciling that puts off a very industrial and grungy vibe - be sure to include lots of metal and texture.
After heeding Cec's words, I've put together this collaged canvas, and great fun it was too !
I started off with a piece of recycled card board just a little smaller than my canvas.....
I covered it in sticky backed aluminium  tape and ran it through my Big Shot, using one of Tim Holtz's new 3-D Texture Fades. This one is called 'Foundry' and it gave a lovely deep impression . I used Modelling paste and a stencil to add a few cogs ......
and then coloured the surface with alcohol inks........
The next stage was to rub the Alcohol Inks back with a piece of wire wool. This highlights some areas and creates a lot of interest where the ink remains. I then added some more stencilling with black acrylic paint and a little stamped label......
I also added some Chunky Rust, Baked Texture embossing powder to the edges. Once the background had achieved a satisfactory level of industrial grunginess, I turned my attention to the focal image. I  covered a piece of craft card with sticky backed aluminium tape and die cut a large butterfly using the Tim Holtz Layered Butterfly die. Instead of using the embossing folder that comes with the die, I decided to use another of the 3-D texture Fades, this one is called Mechanics. I applied Alcohol Inks to the surface and again rubbed some of the colour off, this time, using a piece of fine emery paper.......
I added some wire for the antennae and used more of the Chunky Rust Baked Texture embossing powder on the body. I also shaped the body and the wings by bending them slightly and added a few metal cogs and brads. I prepared the canvas by covering the sides and edges with Tissue wrap. I gave this a 'dirty' wash using Andy Skinner's recipe of Quinacridone Gold, Paynes Grey and a touch of Yellow Iron Oxide.......
Once this was dry, I assembled the canvas and secured the butterfly to the surface with strong dimensional foam tape. A little doodling around the edges and my Industrial Grungy canvas was complete. 
It's been a real pleasure creating this project. Many thanks to Cec for a great challenge! If you'd like to get to grips with a little Industrial /Grungy project, then hop over to the Stamps and Stencils blog with this link, where you'll find all the details of the challenge. You'll also see Cec's beautiful project as well as some gorgeous pieces by the rest of the design team. I think you'll find that there is truly something for everyone. x


Thursday 5 July 2018

Ombre ~ Stamps and Stencils ~ New Challenge


 Happy July everybody ! School's almost out, the sun is shining and holidays are on the horizon. What could be better? Well, how about adding another Stamps and Stencils challenge into the mix! Our lovely host this month, is the very talented Ruth, and she has called it 'Ombre'. This is what Ruth has to say.........

Ombré has been in fashion for a while now and not just in art...or even hair! It's a french word meaning 'a colour that is shaded or graduated in tone'...so for this challenge we want to see projects or part of your project that has one (or more) colour that graduates from it's lightest pastel tint to its darkest shade...got that?? simple...ooh and with a little stamping or stenciling of course!

I've often admired the ombre effects I've seen in other peoples work but have never incorporated the technique into a project of my own. Ruth's challenge presented an ideal opportunity to have a go. I've made a sea themed journal, using the very popular Eileen Hull Travel Journal die. It's super easy to use and when you treat the mount board covers as your 'canvas', the possibilities for embellishment are endless. I started off by stenciling the front and back covers with modelling paste.
I then started to build up the 'sea floor', using gel medium and Prima Art stones, I also added a few Art Pebbles and sprinkled the finer Art Stones over the top in order to fill in the gaps. I find using the Art Stones a little tricky, as they tend to stick to my always glue covered fingers ! worth persevering though as I love the texture they create. i then left the covers to dry completely, before adding a coat of white gesso. If the surface is not completely dry, the Art Stones will come away. 
 after more drying time, I started to paint the covers, using Imagination Crafts, Starlight paint in Turquoise, mixed with a little Deco Art Media paint in Pthalo Turquoise. I used it neat at the bottom and then started adding small amounts of Deco Art tinting Medium as I worked my way to the top of the cover. This is the back.......

I put the covers side by side as I painted them, so that the ombre effect matches.It was fun to see the colour gradually fading  from dark to light.....
I also added a little under sea plant using some painted garden twine.I then turned my attention to the sea horses. These were cast in something called 'Multi-Morph'. This is rather amazing stuff which I discovered accidentally, when searching the web for Friendly Plastic. The product consists of a bag of tiny plastic 'beads' which when placed in hot water clump together to form a mouldable plastic which can be pressed into a silicone mould. I was able to achieve a lot of detail on the sea horses by working the plastic into all of the tiny recesses of the mould. It hardens quite quickly and can be reheated if things don't quite work out. DO NOT, however use in a plastic mould as I ruined my plastic heart mould as the 'friendly' plastic got completely stuck! I should know better.
 I painted the sea horses with Deco Art Media Acrylics. I was pleased to find that the Multi Morph plastic took the paint easily......
I brushed a little mica powder over the surface before the paint had dried completely. I constructed the book  and added the signatures,before adhering the seahorses to the front. I used plain drawing paper, with patterned paper wraparounds, for the three signatures.....
I found some strong elastic hairbands in my local Asda and used these to hold the signatures in the book cover. They work really well and hold the booklets snugly. To finish off the front cover, I used Glossy Accents to attach the sea horses and left them to dry overnight. I also weighted them down so that they are really flat on the surface of the cover.Whilst I'd got the Glossy accents out, I also added some to the surface of the die cuts I used on my sea plant......
I think they look great on their lovely ombre background. I think I shall be revisiting this technique again! If you would like to try your hand at ombre, then why not join in with our challenge. You can make anything you like as long as it includes some stamping or stencilling or both if you wish. Just hop over to the Stamps and Stencils blog with this link and you'll find all of the challenge details, as well as some gorgeous, inspiring projects, by Ruth and the rest of this fab team. hope to see you there! I'm also going to hop this journal over to the Mini Album Makers Challenge blog x


Thursday 7 June 2018

Do Judge a Book By It's Cover ~ Stamps and Stencils ~ New Challenge

Hi folks ! It's time for another challenge over on the Stamps and Stencils blog. Lula is our talented host for this lovely month of June and she has chosen a great theme. This is what she has to say.........

.......'For this challenge  I'd like you to alter any book cover. Creating an altered cover is something anyone can do because your only limitation is your own imagination.  You can use any type of books from children's books or user manuals to art journals. Don't forget to use stamping or stenciling and join us in the fun!....... 

You can read more about Lula's fab challenge over on the Stamps and Stencils blog. Just click on this link  You will also see some gorgeous examples of altered book covers by the rest of the team. My project is an altered notebook, which was originally given away free with a magazine, many moons ago. It was still blank but the cover had seen better days......
 As the cover had a slight texture, I decided to cover it with a piece of canvas. After cutting the canvas to size, I adhered it to the notebook using extra heavy gel medium. The one I have at the moment is from Finabair's range. It worked very well and dried quickly.
I slotted a piece of grease proof paper between the cover and the pages so that they didn't get all stuck together. I then gave it a coat of white gesso. I dried the surface with my heat gun, before applying some lovely bright colours. I used Daler Rowney fluorescent paints and applied them with a paint brush, blending them together at the edges where the colours meet. It looked a bit messy at this point but I pressed on and gave the colours a couple coats, drying with a heat tool between each one. This helped to get rid of any streakiness. I was quite pleased with the way that the colours blended here and there, creating some lovely orange and purple shades.....
Once the paint was dry, I set to with a selection of stencils and began to add pattern and text to the background. when this layer was dry I added some stamping and then doodled here and there channelling  the lovely Kate Crane. This is how the back looks.........
The focal image on the front of the book, uses a stamp I recently bought from the Artist Trading Post. It's by Stampotique and features the amazing artist Frida Kahlo. I stamped onto a piece of fluorescent card using black Archival Ink, I highlighted here signature bold jewellery  with a gold pen and added some flowers in her hair with Posca paint markers. After adding some black ink to the edges of the card I then embossed the whole surface with clear embossing powder.
Before adhering the panel to my book, I blended black ink around the edges. I  painted a border around the inside covers with black paint and then glued a panel of black card to the front and back inside covers. This got rid of the advertising that was inside...... well it was a freebie! To finish off, I  applied strong foam tape to the back of the stamped panel, and a border of black 'pearls'. My last addition, was the Dymo printed sentiment 'What Would Frida Do' She demonstrated a strength in adversity during her short lifetime and was bold enough to not follow the 'rules'. She was also fiercely proud of her Mexican cultural heritage. All qualities which, I must say, I find admirable. 
So there you have it, my book cover makeover was complete. I may add to it when I eventually find the little Milagros charms I have misplaced Grrrrrr.! If you would like to alter a book cover, we'd love to see it. Just hop over to the Stamps and Stencils blog and you'll find all of the challenge details. I look forward to seeing you there! Viva La Vida !