Friday 6 December 2019

Holly Jolly Christmas ~ A Vintage journey ~ New Challenge

Hi everybody! Well there's no getting away from it, Christmas has well and truly arrived! What better way to celebrate the season, than to have a little Christmas challenge. Over on the A Vintage Journey blog, Sandy is hosting our December challenge and this is what she has to say...

 This month Anything Goes as long as it says Christmas and is in one of our preferred styles of vintage, shabby, mixed media, art journaling, industrial, timeworn or steampunk.

I think you'll agree, that Sandy's fabulous challenge, offers a great opportunity for you to share your Christmas crafty makes. I've put together a wintery, Christmas greeting, scene, using an MDF freestanding plaque as my base. This is how I got started....
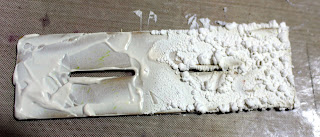
The MDF plaque, comes in two parts , that slot together....
This is helpful, as it means you can keep each piece flat an the table and work on them separately. I applied some 'xpandit' medium to the base and heated it with a heat gun to activate it.....
Here, the heat activated medium is on the right. I think it's perfect for creating a snowy landscape. The medium is a pale cream colour so once it was fully activated, I painted it white and added some crystal glitter to give it that extra sparkle. I used a brick patterned stencil and Grunge Paste, to create the background......
Once dry, I sprayed the surface with,  firstly, Iced Spruce Distress Spray and dried with a heat tool. I then replaced the stencil, and sprayed it with Expresso Distress Spray......
I dried it thoroughly, before dry brushing the surface with white acrylic paint. I then turned my attention to the Christmas tree. In order to allow the tree to stand against the background, I trimmed one half of it so that it was relatively flat. I then sprayed it with Peeled Paint and Crushed Olive Distress Sprays. The little baubles are silver beads that have been coloured with Alcohol inks. I adhered them to the tree using Cosmic Shimmer glue....
I also swiped a little glue over the tips of the tree and sprinkled on some of the crystal glitter. I then assembled the base and the background, and glued the tree on. I secured it with an elastic band until the glue dried.......
I used Distress Markers to add a little colour to the Paper Dolls......
In order to make them stand away from the background, I added several layers of foam tape to their backs. The finishing touches were to add the diecut Merry Christmas and of course, a little star to top the Christmas tree.
I hope you have enjoyed this walk through my Holly Jolly Christmas project. If you have a bit of spare time to make a project, or maybe you already have made something  Christmassy, in the styles we love at  A Vintage Journey, we would love to see it. Just hop over to the A Vintage Journey blog, and you'll find Sandy's lovely work as well as some inspiring projects from the other Creative Guides. In case I don't get back here before the big day, I wish you all a very happy Christmas and a peaceful and joyous New Year xx

Friday 4 October 2019

Inky Wings..... A Vintage Journey.....New Challenge

Hi everybody! It's time for another challenge over at A Vintage Journey. Our talented Creative Guide Annie, is our host for this month and the title she has chosen is 'Inky Wings'. I think you'll agree that there is fabulous scope here and I can't wait to see what you come up with. After all, I don't know many crafters that don't like a wing or two! As usual, there is some wonderful inspiration from the Creative Guides, over on the A Vintage Journey Blog. This is what Annie has to say about the challenge......

Make any project you like as long as ink and wings are included in some way. This includes backgrounds, stamped images, art journals, and portions of your project coloured with ink. Any kind of ink is welcome, so let's get creative within our preferred styles of vintage, shabby, mixed media, art journaling, industrial, timeworn or steampunk.

I said there was plenty of scope! This is how I put my project together.........
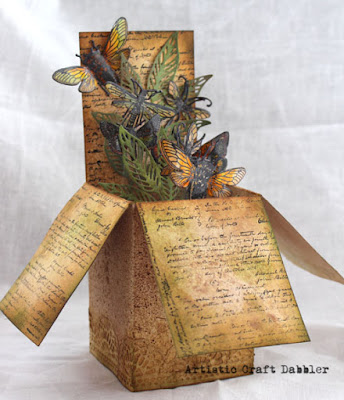
I used a template for a pop up box card, and cut it out from white card. I sprayed the card on both sides, with Distress Ink in Vintage Photo and Antique Linen. I then used the script stamp from the 'Entomology' stamp set on the box flaps.......
I stamped out several winged insects in black Versa Mark ink and heat embossed them, before colouring, with water colour brush pens.....
After cutting out my insects, using the corresponding dies, I heat embossed each one with clear embossing powder.....
I also die cut a couple of leaf sprigs leaves, using card that had been coloured with Distress Oxides. The next step, was to attach the insects to some thin strips of clear acetate, which I had salvaged from discarded packaging. I used Cosmic Shimmer glue, which seems to have held them on very well.....
It was now time to assemble my pop up box. I'm afraid there are no pictures of the assembly, as you just have to keep going once you start. I've put four card divisions inside the box and attached the acetate 'stems' with double sided sticky tape. If you have never made one of these before, there are templates and videos available on line. Just search for 'pop up box card'. They are good fun to make and I think the possibilities for decoration are endless. Here's a close up of the insects. The clear acetate 'stems are barely visible and make the insects look as though they are flying out of the box. Yay result!......

and here's  the finished pop up (again).........


If you would like to join in with our Inky Wings challenge, please hop over to the A Vintage Journey blog with this link. Once there, you'll see Annie's beautiful project as well as some fabulous work by the the other Creative Guides. I hope you will join us, as I know we are all looking forward to seeing what Inky Wings you come up with.x 


Friday 6 September 2019

Box it Up ! ~ A Vintage Journey ~ New Challenge

Hi everybody! It's time for a new challenge on the A Vintage Journey blog. Julia is our fabulous host this month and she has chosen a fun topic which she has called 'Box it Up' This is what Julia has to say.....
This month our theme is boxes! Perhaps you will make a trunk or suitcase, some kind of package to hold a gift, or maybe make a card or journal page showing presents. Just remember to ensure that you create in one of our preferred styles of vintage, shabby, mixed media, art journaling, industrial, timeworn or steampunk.
Well ! this was a timely topic for me, as I am always finding little piles of loose change around the house when I'm tidying up. Coins can found down the side of the sofa, in the bathroom , by the phone in fact just about anywhere .....Does anyone else experience this? I think the men in my life must have too much of the stuff . So, I decided to make this little money box and I shall put any loose change I find into it, after all 'finder's keepers' ! Unfortunately I had forgotten to charge my camera battery so I do not have many process pictures but this is how I got started......

I firstly embossed some lengths of sticky backed aluminium foil tape and applied some colours of Alcohol Ink to the surface.
I then die cut the box out of grey board, using Eileen Hull's Canister Die. I constructed the canister and left it a while to make sure that the glue was completely dry. I used Cosmic shimmer glue and held the seams together with clips.
Once dry I covered the canister with the Aluminium foil.....
I distressed the surface, by lightly sanding back the alchohol ink with wire wool. It was then time to add the embellishments. I gathered together some die cut cogs, some skeleton hand pendants, and a Tim Holtz label frame......
I gave them all a rusted finish by heat embossing them with Seth Apter's Baked Texture embossing powder in  'Chunky Rust'. This technique is a great way of quickly and easily creating a 'rusty' finish on all kinds of substrates. Here's a closeup....
I used Cosmic Shimmer glue to attach most of the embellishments. The skeleton hands were a little more difficult to hold down, so I used a little blob of silicone. Now all I have to do is keep on collecting all that loose change that nobody seems to want!I let you know how much is in there once it's full !
 If you would like to enter our challenge, then hop over to the A Vintage Journey blog with this link . Once there, you'll find some fantastic inspiration by Julia and the other Creative Guides as well as the challenge rules. I look forward to seeing your creations. x


Friday 30 August 2019

A Vintage Journey ~ Tag Friday ~ Holiday Memories.

Hi everybody! This is the fifth Friday in August and, of course, this means that it's a 'Tag Friday' over at the A Vintage Journey blog. Ever since being introduced to the joys of tag art, through Tim Holtz's Twelve Tags challenges, I jump at the chance to create one, as it is always so much fun! I've chosen a sea theme for this tag, so that I can capture a memory of my holiday in beautiful  Northumberland. This is how I did it.......
I began by stenciling the surface with white gesso. Once dry, I sprayed the surface with Distress Inks in shades of blue and green. The gesso acts as a resist to the ink and leaves a very clear image. I dried the surface with a heat gun. I then tried out a 'new to me' product called Xpandaprint, available from Art Van Go. I applied a layer of the paste around the edges of the tag, using a palette knife and gently tapping it on the surface. I then used my heat gun to activate the paste.....
On the left side, the Xpandaprint has bubbled up after being heated. On the right side, you can see the paste as I applied it. Once all of the paste had been activated, I sprayed the areas with more Distress Inks. After drying the ink, I did a little dry brushing with white acrylic paint
I love the texture the Xpandaprint creates, it's also very lightweight. Once my background was finished I set to work on the different elements. I already had the casts of the shells and seahorse, so I only had to apply a little paint and dry brushing to them. I also had a piece of  distressed scrim lying around which I sprayed with the same blue Distress Ink. In addition to these elements, I die cut and heat embossed a few leaf stems from one of Tim's Wildflower Stems. I then started to try out a few arrangements leaving a space in the middle for my photograph of the sea at Budle Bay.....
Once I was satisfied with the arrangement, I secured the elements with glue and dimensional pads. I mounted the photo in a die cut frame.This is also a Tim Holtz die called, Pocket Frame....
I added a few glass bubbles and my tag was finished. I'm hoping the memory of the glorious Budle Bay with its miles of white sandy beaches, will keep me going through the winter ! If you'd like to see a fabulous collection of tags, please hop over to the A Vintage Journey blog and feast your eyes upon the tags the Creative Guides have put together. Until next time,'happy creating!' x

Friday 5 July 2019

Precious Metal ~ A Vintage Journey ~ New Challenge


Hi everybody! It's time for a new challenge over at A Vintage Journey. Amanda is our super talented Creative Guide this month, and she has chosen the title 'Precious Metal'. This is what Amanda has to say....

'For this challenge we would like to see some kind of precious metal feature in your project. Think gold, silver, brass, copper, aluminium, steel..... It could be in the form of embellishments, cardstock,  paint, gilding wax, foil, gold leaf or rub ons. Just remember to ensure that you create in one of our preferred styles of vintage, shabby, mixed media, art journaling, industrial, timeworn or steampunk.'

 Now, Amanda is obviously a woman after my own heart as I love using metal. You can see Amanda's fabulous project by hopping over to the A Vintage Journey blog with this link. You will also see some wonderfully inspiring work by The other Creative Guides.

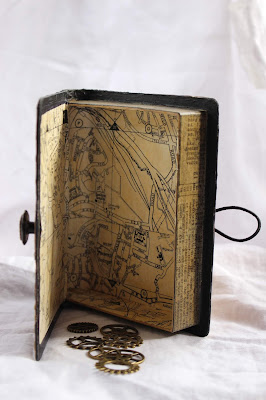
Those of you that have  visited my blog over the years, may know that I have a minor obsession for creating with spent tomato paste tubes. I never, ever throw these tubes away as they are a fantastic source of bright, shiny, precious metal. Let me show you how I used them to transform this paper mache book box.......
I bought the book box from Hobby Craft. It's a really nice size not too big, not too small, with a height of approximately 15cm and cover width 10.5cm....
The cover proved to be the perfect size for a tomato paste tube. To prepare the tubes, I cut off the top and bottom and then cut down one side. I rinse off any remaining tomato paste and flatten out the tubes. I use a wooden spoon to get out any creases. You have to be a little careful as the sides can have some jagged bits, these can be easily cut away with scissors. For this project, I used one tube for the front cover and one for the back. I embossed them with Tim Holtz's 3d Cogs embossing folder, which gave a wonderfully deep impression. I then painted them with Deco Art, black, Antiquing Fluid. once dry, I wiped the surfaces, gently, removing some of the colour. This is a super, easy, technique which gives an instant 'antique' finish to embossed metal. I then dabbed over the surface using Archival Ink in Potting Soil. Here's a picture of the various stages.......
Before applying the metal to the book box, I adhered a piece of black fabric along the spine I also painted around the edges, inside and out, with black acrylic paint. 
I then trimmed the metal so that it fitted the box book cover. It was fortuitous that the covers are around the same size as the embossing folder I used. I also rounded the corners with my  corner 'chompers'.
 I adhered some text washi tape around the sides of the box. It  was then ready to add the embossed metal to the covers. I used heavy matte gel medium and left it to dry for several hours. When I came back to it, I used a poky tool to make  holes, so that I could add an elastic loop to the back and a jeans button to the front as a fastening for the 'book'. I used Glossy Accents to fix a little metal cog on top of the button, which I think has worked really well......
 I used some paper from and old street map to cover the interior......
 To decorate the front of the book, I added one of the new Idea-ology Stencil chips. It's almost is the same colour as the metal cover. I think I might need a bulk order of these beauties ! I glued a piece of black card behind the letter to make it stand out....
This is what the back looks like.....
The streak of silver down the middle is where the tube was folded, I think it rather adds to the distressed look!  The finishing touches were to add some faux studs down the side front panel and  a little Dymo label echoing the challenge title, saying 'Precious' . It was a little stark in black and white so I toned it down with some Butterscotch alcohol ink.
I thoroughly enjoyed creating this for our 'Precious Metal' challenge. If you'd like to join in with the challenge, all you have to do is hop over to the AVJ blog with this link  Once you're there, you'll find the challenge guidelines as well as plenty of inspiration to kick start your creativity. I'm looking forward to seeing all your Precious Metal projects. x  


Friday 7 June 2019

A Vintage Journey ~ New Challenge ~ Tissue Paper.


It's time for a new challenge over at  A Vintage Journey. Our Creative Guide for this month is the wonderfully talented Astrid, and she has chosen, 'Tissue Paper'. This is what Astrid has to say.......

There are many different ways you can incorporate tissue paper into your project - create texture by scrunching it up, stain it, paint it, wax it, stamp on it, emboss on it. You could use cheap tissue from the supermarket, recycle gift wrapping tissue, or even use old dressmaking patterns. Just remember to create in one of our preferred styles of vintage, shabby, mixed media, art journaling, industrial, timeworn or steampunk.

I was really excited by this challenge as I have enjoyed using tissue paper in several of my past projects, it has so much potential. My main problem was trying to decide which of the many ways I was going use it! After some deliberation, I chose to stamp on recycled packaging tissue, and then use it to decorate a ceramic plant pot. This is how I did it......

Here is the pot I used before it's makeover.  The first thing I did, was to give it a coat of white gesso. This provided a nice neutral surface for the tissue paper.  Whilst this was drying, I stamped out several sheets of plain white tissue paper, using a gorgeous bee stamp (origin unknown),  and also the fabulous #161 Ladybug stamp by Tracy Evans, for Aall and Create. I used black Versafine Ink to stamp with. 
After heat setting the ink with a hot air tool, I began tearing the tissue paper into manageable pieces, preserving some complete images of the ladybirds and bumble bees. I then applied the tissue to the pot using Mod Podge adhesive. As the tissue is quite fragile when wet, it was much easier to paint the Mod Podge onto the surface of the pot and gently smooth the tissue on top. Here is the covered pot......
 I also added a couple of bumblebees to the inside. I left the pot to dry completely and then started to apply some colour. I used Deco Art Media Fluid acrylic paint to add colour to the ladybirds and also a little colour wash in the hearts and background. Once the paint was dry, I sealed the surface with Matte Medium, left it to dry (again!), and then gave it a coat of Crackle Glaze. Once the crackles had developed I applied DecoArt Antiquing fluid and wiped it back to reveal the crackled surface....


To finish off the surface, I gave the whole pot a coat of 'dirty wash'. This is basically, a watery mixture of Paynes Grey and Quinacridone Gold. I coloured the rim of the pot with a gold paint marker, before spraying it, inside and out, with matte acrylic varnish. I then added a twist of rusty wire and a little ladybird charm. I also remembered that I had a set of travel dominoes and as the Ladybug stamp set features images of dominoes, I thought it would be fun to make a charm out of one. With that, my pot transformation was complete. Now I just need to find a suitable house plant to stand in it. I think I can feel a trip to the garden centre coming on!
 If you would like to use tissue paper in a project we would love you to share it with our Tissue Paper Challenge. Hop over to the A Vintage Journey blog with this link, and you'll find the challenge details as well as a wealth of inspiration from Astrid and the other Creative Guides. I look forward to seeing what you come up with. x

Friday 31 May 2019

A Vintage Journey ~Tag Friday ~ and Much Excitement!

Hi everybody! I'm very excited to announce that I am joining the A Vintage Journey blog, as one of their 4 new Creative Guides! I have been a big fan of AVJ for many years and it is a dream come true for me to be joining this fabulous team. My first post is for Tag Friday. This happens whenever there are five Fridays in the month. You can see some stunning work by some of the other Creative Guides with this link. As we are enjoying a lovely Spring season here in the UK, I've chosen a Spring theme for my tag. This is how it came together...
Firstly, I used Distress Oxide and Distress spray to colour the background...
Once dry, I ran the tag through my Big Shot, using Tim Holtz's Botanical Flowers 3D embossing folder. I also stitched around the edges with my sewing machine....
I stamped out the nest using the Stampers Anonymous, Bird Feather set using a piece of card that I coloured at the same time as the tag. I then fussy cut it and added some little 'eggs'.
 
My next step was to create a little fairy child to look after the eggs! I used one of the most adorable Paper Dolls and honoured him with a pair of Tim's gorgeous Transparent Wings...
 To enable him to sit snugly in the nest, I folded him in the middle and at the knees. This added just  enough dimension. I happened to have a set of hat stamps on my work table and when I spied a little crown, I couldn't resist using it to add a finishing touch. My final step, was to add a little more texture. I used corrugated card sprayed with Vintage Photo Distress Ink and added a Remnant Rub On, saying 'Found'....
The addition of a couple of faux rust brads and a piece of linen thread and my tag was finished. I have to say that I'm rather in love with this little cutie!
I hope you've enjoyed this little walk through and I hope you'll be back to see what else I get up to as a Vintage Journey Creative Guide. Ooooo! sounds good eh! x


Friday 5 April 2019

Spring Tag ~ It's Good To Be Back !

Hi everybody! I'm almost ashamed to say that this is my first post of 2019! I've had a little break as real life events have needed my attention. I'm now, very pleased to have a bit more time on my hands! What better way to get back into crafting, than with constructing a tag.........
I started off by creating a textured background, using a wonderful little Dyan Reavely stencil and some modelling paste. The stencil was part of a Ranger freebie given away with with one of the craft magazines. As the stencil was smaller than the tag, I  re-positioned it couple of times allowing the modelling paste to dry each time. I then used my newly acquired Distress Oxide Sprays to colour the surface. It's the first time I've used them and was impressed by how well they covered the textured surface. 
This was how it looked after the first layer of colours. I decided, eventually to use more blue, but was pleased that the amber colour shows through slightly just adding a little glow. I used my favourite bird stamp for the focal image. I hope all the bird watchers out there will allow me a little artistic licence, as I'm pretty sure it's really a Sparrow but has been transformed by the magic of Distress Crayons into a Blue Tit!
The flowers were made using Tim Holtz's Spiral Flowers Thinlits Dies. I love these dies and haven't used them nearly enough! 
The letters that spell the word 'Fly', have been die cut in thin copper sheet using one of Tim's Bigz alphabet dies. I then used a soldering iron and covered the surface of each letter with solder. This is a technique I learnt when I followed the 'Wanderlust' course the other year. It's something I will certainly be doing more of as I love the pewter type finish,
Hope you've enjoyed seeing how my tag came together. I 'm going on holiday for a couple of weeks but will be back with another project soon! x.