Hi everybody! It's time for a new challenge over at A Vintage Journey. Amanda is our super talented Creative Guide this month, and she has chosen the title 'Precious Metal'. This is what Amanda has to say....
'For this challenge we would like to see some kind of precious metal feature in your project. Think gold, silver, brass, copper, aluminium, steel..... It could be in the form of embellishments, cardstock, paint, gilding wax, foil, gold leaf or rub ons. Just remember to ensure that you create in one of our preferred styles of vintage, shabby, mixed media, art journaling, industrial, timeworn or steampunk.'
Those of you that have visited my blog over the years, may know that I have a minor obsession for creating with spent tomato paste tubes. I never, ever throw these tubes away as they are a fantastic source of bright, shiny, precious metal. Let me show you how I used them to transform this paper mache book box.......
I bought the book box from Hobby Craft. It's a really nice size not too big, not too small, with a height of approximately 15cm and cover width 10.5cm....
The cover proved to be the perfect size for a tomato paste tube. To prepare the tubes, I cut off the top and bottom and then cut down one side. I rinse off any remaining tomato paste and flatten out the tubes. I use a wooden spoon to get out any creases. You have to be a little careful as the sides can have some jagged bits, these can be easily cut away with scissors. For this project, I used one tube for the front cover and one for the back. I embossed them with Tim Holtz's 3d Cogs embossing folder, which gave a wonderfully deep impression. I then painted them with Deco Art, black, Antiquing Fluid. once dry, I wiped the surfaces, gently, removing some of the colour. This is a super, easy, technique which gives an instant 'antique' finish to embossed metal. I then dabbed over the surface using Archival Ink in Potting Soil. Here's a picture of the various stages.......
Before applying the metal to the book box, I adhered a piece of black fabric along the spine I also painted around the edges, inside and out, with black acrylic paint.
I then trimmed the metal so that it fitted the box book cover. It was fortuitous that the covers are around the same size as the embossing folder I used. I also rounded the corners with my corner 'chompers'.I adhered some text washi tape around the sides of the box. It was then ready to add the embossed metal to the covers. I used heavy matte gel medium and left it to dry for several hours. When I came back to it, I used a poky tool to make holes, so that I could add an elastic loop to the back and a jeans button to the front as a fastening for the 'book'. I used Glossy Accents to fix a little metal cog on top of the button, which I think has worked really well......
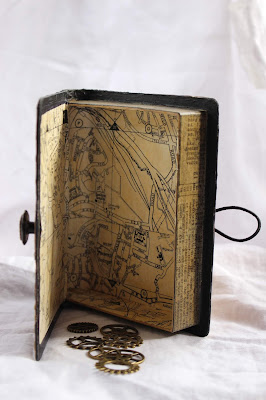
I used some paper from and old street map to cover the interior......
To decorate the front of the book, I added one of the new Idea-ology Stencil chips. It's almost is the same colour as the metal cover. I think I might need a bulk order of these beauties ! I glued a piece of black card behind the letter to make it stand out....
This is what the back looks like.....
The streak of silver down the middle is where the tube was folded, I think it rather adds to the distressed look! The finishing touches were to add some faux studs down the side front panel and a little Dymo label echoing the challenge title, saying 'Precious' . It was a little stark in black and white so I toned it down with some Butterscotch alcohol ink.
I thoroughly enjoyed creating this for our 'Precious Metal' challenge. If you'd like to join in with the challenge, all you have to do is hop over to the AVJ blog with this link Once you're there, you'll find the challenge guidelines as well as plenty of inspiration to kick start your creativity. I'm looking forward to seeing all your Precious Metal projects. x


