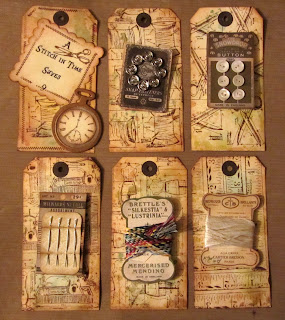
This is my latest design team project I've made for the eclectic Paperie blog using my new goodies from the lovely eP shop. I ordered the new Tim Holtz Mini Blue Print Set 3 and the Mini Pocket Watch die, there were other things in my order but I'll share those at a later date. Boy I'll never be rich! The project I've made is a 'tag book sewing kit' and this is how I put it together. I started out by printing off some vintage sewing clipart from a Tim Holtz Distressables Elements CD I've had for ages.I also used some clip art I already had on my computer.
I glued my chosen pictures to a piece of paper from the Authentique Renew collection. I almost hate using these gorgeous papers as I have to decide which side to use and I always love both sides! I then cut out the images and gave them a bit of Vintage Photo Distress Ink around the edges. Once dry, I added some sewing notions to each card, thread, needles, press studs and some vintage pearl buttons. I then turned my attention to making the tag backgrounds. I used some tags I already had in my stash, they measure 5" x 2 1/2". I splodged a variety of Distress Stains onto my craft mat and smooshed the tags through, first one side and then the other.
Once dry, I inked over them with Antique Linen Distress before stamping over with the Mini Blue Print Stamps on both sides,using Gathered Twigs Distress ink and more Vintage photo around the edges.
I really like the way these stamps can be used to create a background pattern. I also used a tape measure stamp I had in my collection for one of the tags. my initial idea was to fold and sew the bottom of the tags to create a pocket to put the cards in, but it didn't show enough of the cards. So I had a rethink and decided to use some sticky backed Velcro spots.
These, I think, work really well. As you can see the whole of the card plus some of the tag background and the cards are quite securely attached but easy to remove.
I really like the way the sewing cards look like they're straight out of a vintage sewing basket. On the last tag which became the front cover, I used my new die to create a mini pocket watch. I die cut two shapes and punched out the centre of one of them with a 1 1/2" punch. I added Treasure Gold paste to the frame and stuck a piece of acetate on the back. I then stamped the watch face onto a piece of manila card, cut it out and mounted onto the die cut shape I then glued the frame on top. I finished off by adding a computer print out of the age old saying " a stitch in time saves nine" wise words indeed.x
These are some of the lovely goodies I've used on this project which are available from the eclectic Paperie Shop.


Hi Toni, I have just spent ages over at eP just drooling over this fabulous make. You have managed to make something new look so vintage and I love all the elements you added. Fabulous!! Hugs, Anne x
ReplyDeleteThis is sooo cool, Toni - I absolutely love the inking and stamping of the tags, and your finished album is just delicious... and my favourite pocket watch I've seen so far - love it!
ReplyDeleteAlison x
Fabulous creation, Love the backgrounds...the stamping is fabulous.. Wonderful tag album Toni... Hugs May x x x
ReplyDeleteBeautiful! Love what you've done with those blueprint stamps.
ReplyDeleteOooooh, I love it. What a great job Toni.
ReplyDeleteWow Toni, Love everything about this tag album. Great stamping and backgrounds. This would make a great gift. Hugs Mo x
ReplyDeleteThis album is SEW awesome!!! I love the elements and stamping, and how it attaches with velcro...brilliant! Vintage goodness here!
ReplyDelete