Hi everybody! Well there's no getting away from it, Christmas has well and truly arrived! What better way to celebrate the season, than to have a little Christmas challenge. Over on the A Vintage Journey blog, Sandy is hosting our December challenge and this is what she has to say...
This month Anything Goes as long as it says Christmas and is in one of our preferred styles of vintage, shabby, mixed media, art journaling, industrial, timeworn or steampunk.
I think you'll agree, that Sandy's fabulous challenge, offers a great opportunity for you to share your Christmas crafty makes. I've put together a wintery, Christmas greeting, scene, using an MDF freestanding plaque as my base. This is how I got started....
The MDF plaque, comes in two parts , that slot together....
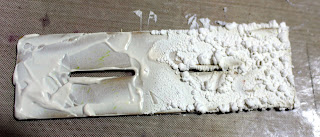
This is helpful, as it means you can keep each piece flat an the table and work on them separately. I applied some 'xpandit' medium to the base and heated it with a heat gun to activate it.....
Here, the heat activated medium is on the right. I think it's perfect for creating a snowy landscape. The medium is a pale cream colour so once it was fully activated, I painted it white and added some crystal glitter to give it that extra sparkle. I used a brick patterned stencil and Grunge Paste, to create the background......
Once dry, I sprayed the surface with, firstly, Iced Spruce Distress Spray and dried with a heat tool. I then replaced the stencil, and sprayed it with Expresso Distress Spray......
I dried it thoroughly, before dry brushing the surface with white acrylic paint. I then turned my attention to the Christmas tree. In order to allow the tree to stand against the background, I trimmed one half of it so that it was relatively flat. I then sprayed it with Peeled Paint and Crushed Olive Distress Sprays. The little baubles are silver beads that have been coloured with Alcohol inks. I adhered them to the tree using Cosmic Shimmer glue....
I also swiped a little glue over the tips of the tree and sprinkled on some of the crystal glitter. I then assembled the base and the background, and glued the tree on. I secured it with an elastic band until the glue dried.......
I used Distress Markers to add a little colour to the Paper Dolls......
In order to make them stand away from the background, I added several layers of foam tape to their backs. The finishing touches were to add the diecut Merry Christmas and of course, a little star to top the Christmas tree.
I hope you have enjoyed this walk through my Holly Jolly Christmas project. If you have a bit of spare time to make a project, or maybe you already have made something Christmassy, in the styles we love at A Vintage Journey, we would love to see it. Just hop over to the A Vintage Journey blog, and you'll find Sandy's lovely work as well as some inspiring projects from the other Creative Guides. In case I don't get back here before the big day, I wish you all a very happy Christmas and a peaceful and joyous New Year xx


What a beautiful Christmas plaque Toni ! Fabulous texture on the wall and a great way to layer all those wonderful embellishments in front. I am sure it will be treasured for many Christmas's to come! Have a lovely weekend.Jennie x
ReplyDeleteToni! Such a lovely,vintage-y Christmas treasure you've created, I adore it. All of the wonderful textures and techniques you've so beautifully employed are amazing and the sweet children are delightful! Oh, that I could create something so endearing. Thank you for sharing!
ReplyDeleteWhat a lovely little Christmas vignette Toni, love the textures on the back wall and the snowy base (have never heard of the 'xpandit' medium, very cool!) and you have embellished it perfectly with your sentiment, that lovely Christmas tree and of course those adorable Paper Dolls. Thanks so much for sharing it, Deb xo
ReplyDeleteWhat a beautiful project, I'm sure you will enjoy displaying it each year. The texture on the background is so amazing. Love the Paper Dolls. Happy Holidays, S@ndy
ReplyDeleteWow, what a beautiful winter scene! I enjoyed seeing how it all came together, you created so much Christmasy details - I love it 😁. Wishing you a Holly Jolly December! Hugs, Jo x
ReplyDeleteJust stopped by to wish you and yours a magical Christmas and a very happy New Year! Hugs, Jo x
DeleteWhat a fantastic wintery scene Toni, such a wonderful piece! It will make for a fantastic Christmas display, - so beautifully put together with that tree and the paper dolls!
ReplyDeleteHappy December!
I adore your Christmas home decor project, Toni! It was so fun 'seeing' it come together! The brick is fantastic and you've added just the right amount of embellishment so as not to be busy. I especially love your coloring! A home run and a piece that I'm sure is the center of attention in your home! Sending warm Christmas wishes!
ReplyDeleteOh this is wonderful Toni! The children look so dimensional in front of your lovely brick wall and beautiful tree! Wishing you a Merry Christmas! xx
ReplyDeleteLovely work
ReplyDeleteI feel so bad... I only just realised that I never got around to visiting the Holly Jolly projects, and now the next challenge is almost upon us!
ReplyDeleteI'm delighted to catch up with this charming winter scene now. The bricks look just right and I love how you've used the die-cut lettering to create some festive "graffiti"! I hope the Paper Dolls' feet won't freeze in all that snow. Just lovely!
Alison x
I so enjoyed reading your post and I have learnt tons....Thank you for the wonderful inspiration with your creative and fabulous project x.
ReplyDelete