Friday, 18 September 2015

Twelve Tags of 2015 ~ September

Hi everybody! I can hardly believe that I'm posting my tag for Tim's twelve Tags of 2015 challenge, before the last day of the month. Hooray! I managed to snatch a few hours in my crafty attic yesterday afternoon and I knew, I would (as always), enjoy making my tag. I absolutely love the gorgeous colours on Tim's tag this month, so I started off by having a play with my alcohol inks.......
These are some of my bright backgrounds. I was struck by how much difference it made to the backgrounds, when I added an inked edge to them, as in the first and last in this line up. I was on a bit of a roll and made quite a few backgrounds, experimenting with different colour combos and spraying or dripping on blending solution.......
These are some of my favourites, using a more neutral colour palette. As you can see from my finished tag, it was one of these that won the day. The others will be put aside for future use. I haven't got those fabulous butterfly stamps that Tim used and although I have other butterflies, I decided to think outside the box. After much perusing through my stamp collection I decided to go a little spooky with the wonderful skull stamp, and make  my first Halloween project of the season. thanks once again Tim, I'm always amazed that you can come up with such brilliant ideas and techniques month after month.......speaking of which there are only 3 more to go ! x 

Thursday, 3 September 2015

Up, Up and Away~New Challenge for Stamps and Stencils

Hi Everybody! It's the first Thursday in the month and that means  it's time for a new challenge over at Stamps and Stencils. Sharon is our fabulous host and this is what she has to say......

 Up, Up and away with a twist ! For this challenge we would like to see something that goes Up Up and away. It could be a plane, bird a feather anything that can go up, but you must use /autumnal colours. So get out the copper, rust and burnt oranges. Be it paint, metal or embossing powders, don't forget to include some Stamps and Stencilling....

I think you'll agree that this is a fabulous challenge, with plenty of scope. I love autumnal colours and I have plenty of  'winged things' stamps ! My project is this little four piece panel with lots of stamping and stenciling. I started by colouring some pieces of manila card with Dylusions Sprays. 
I dried them with a heat tool and then ironed them flat. I then selected a few stencils and added some pattern with Distress Inks in similar autumn shades.
I then die cut the four arches, one from each background piece, and also four more in thicker craft card. I then adhered the coloured arches to the craft card using Matte Multi Medium. The added bonus is that I've still got lots of coloured card to play with! I had a lot of fun selecting the stamps and building a kind of stamped collage on each shaped piece. I used black Archival ink for stamping and clear embossing powder over the top. Once I was happy with the arches, I gave each one a quick spritz with a gold spray. I have the tiniest bit left of a gold spray by Crafty Notions. It is the best I've ever had, really sparkly and has never clogged up in all the years I have had it. Yes years! I digress....Here are some close ups of the individual panels
number one....
and two....
and finally....
As you can see, the panels are joined together by adding brass eyelets and threading through some dyed ribbon. There is a little dusting of gold embossing powder here and there and the edges have black Archival Ink blended in.  This was a lot of fun to make, sometimes it's lovely to get down to some good old stamping ! I hope you can find some time to join in with our challenge this month, dig out those stamps and stencils and get stuck into some lovely Autumn colours. You'll find all the challenge details and see some wonderfully inspiring pieces by the rest of the brilliant design team by following this link. I look forward to seeing what you come up with, For now though it's Up, Up and Away to finish cooking tea! x


Tuesday, 25 August 2015

Twelve Tags of 2015 ~ August ~ Uncle Jim

Hi everybody!I hope my UK friends are enjoying this typical British Summer, rain, rain and more rain ! Still, the best way I know of cheering myself up on a wet afternoon, is spend some time in my craft room. Thanks to Mr Holtz, I happily spent a few hours absorbed in making my tag for this month's Twelve Tags of 2015 challenge.  I was a bit daunted when I first saw Tim's tag, as I haven't got any of the  lovely Word Block Dies. I'm also running low on Ideaology bits and bobs. Still, I see this as all part of the challenge, it makes you put your thinking cap on! For my die cut background I used Tim's Typeset Alphabet strip die. As I use a Big Shot die cutting machine, I was able to cover the last inch of the tag with a thicker piece of card in order to prevent the die from cutting through the bottom of the tag. The cool looking dude in the picture, is my ' Uncle Jim'.  He came to England from Nigeria, at the same time as my dad, in the early 1950's. They were best friends and our two families spent a lot of time together as we were growing up. They remained firm friends throughout their lives and sadly, they passed away within a year of each other.  I love this picture and have welcomed the opportunity to use it this month's tag. x

P.S. Just been having a look at this month's entries, wow.. there are some fantastic interpretations!

Thursday, 6 August 2015

Time Flies ~ New Challenge for Stamps and Stencils

It's the first Thursday of the month and that means it's time for another challenge over at Stamps and Stencils. The very talented Yvonne is our host, and this is what she has to say......

'For this challenge we would like to see clocks/watches/or any other time related element
 as a focus on your project. Remember we are are a mixed media challenge blog
and we would like to see some stamps and/or stenciling'

 While I was mulling over the challenge title, the song, 'Fly Like an Eagle', by The Steve Miller Band, with the opening lyric, 'Time keeps on slippin', slippin', slippin' into the future....', sprang into my head. This set the theme for my project, which is a little 5x7 inch canvas, in a fun 'Steam Punk' style. I got a bit carried away as I was working on it and haven't taken too many photos of the process, however, here is a shot of the background before it got covered up.....
In this picture, you can see the stamped tickets laid out on the surface. You can also see a bit of a splodge in the middle. This is where I had stamped directly onto the canvas and then changed my mind and decided so make stamped tickets instead. The original stamping didn't show up enough, so I stamped some small die cut tickets with the months of the year and adhered them to the background.
The die cut pocket watch, was treated with Vintage Photo, Distress Embossing powder and a smear of Treasure Gold around the edges. The stamped image, has been coloured with Distress Markers and a water brush. The wings have been cut from card covered with aluminium foil tape and then embossed with a cogs and gears embossing folder. They've been coloured with Alcohol Inks and have had a few cogs attached to them.
I love the phrase as it just about sums up 'time' to me. So lets all make a point of using a bit more of it to do the things we love !!!
If you've got a bit of time on your hands and would like to join in with our challenge, hop over to the Stamps and Stencils blog with this link and you'll find all the details of how to join in. You will also find some fabulous inspiration from the rest of the design team. I look forward to seeing your creations. x

Wednesday, 29 July 2015

Twelve Tags of 2015 ~ July

With only a few days left of the month of July, I've taken a quick break from domestic tasks, to post my tag for Tim's Twelve Tags of 2015 challenge. It may be July and the height of summer but it's more like autumn here in the UK, with far too many grey and rainy days ! Come on Sunshine do your thing ! Sorry to digress but you know how much us Brits like to talk about the weather ! Back to The tag, which is yet another great idea from Tim. You can see his fabulous 'Independence Day' inspired tag, with this link. As It's now far from that date, I decided to go with a different interpretation using the lovely Flower Garden stamp set. After stamping and colouring my chosen flowers, I realised that  they wouldn't fit on my no.8 tag, so had to cut a larger one from manila card. I thought I was being fairly original until I had a look through all the wonderful entries for this month and spied a gorgeous tag by Diana over at Missusgmoments .Well, you know what they say 'great minds think alike ! One of my favourite elements of Tim's tag this month, is the fabulous stripy ribbon such a cool technique ! I made an extra long piece so that I could make a nice big bow. So that's it for now, back to a few more chores. Thanks for yet another great tag Tim ! x

Thursday, 2 July 2015

Happy Holidays ~ New Challenge at Stamps and Stencils

Hi everybody ! It's my turn to host the July challenge over on  the Stamps and Stencils blog. I've chosen the theme of 'Happy Holidays' and  I look forward to seeing as many different interpretations as you happy crafters can come up with ! Just remember to use some stamping and stenciling. Full details and challenge rules can be found over on the Stamps and Stencils blog.
I've made a  photo album, to house an assortment of my old holiday snaps. The album is made of chipboard and I constructed it by following a plan from one of my craft books called 'Interactive Mini Scrapbooks by Kathy Orta Files. I had to give it a mixed media twist by adding this Finabair inspired canvas and card cover. I started by stenciling a piece of gessoed canvas with embossing paste.
I then applied Distress Paints and once they were dry, I sprayed on Dylusions Sprays in various blues and greens.
While this was drying, I turned my attention to a couple of panels I wanted to mount on the cover.
I applied gesso to a couple of pieces of kraft card, and stenciled them with embossing paste. I then selected some shells, which were gathered on various holidays and secured them to one of the panels using a hot glue gun.
I used more Dylusions Sprays to add colour and finished off by highlighting the shells with Silks Paints. Once everything was completely dry, and the interior of my album was finished, I adhered the canvas to the album using Liquitex heavy bodied matte gel. I also used this to secure the card  panels to the front panels. I love the fastening, which I cribbed from the book. It's a mini bulldog clip,  attached to a swivel clip, with a piece of chain secured to back of the book, through an eyelet with a jump ring attached to the chain to prevent it from pulling through. (leave me a comment if you want to know how to do this ) You may be wondering about what's going on inside, curious ? well here are a few pics......
I scanned a few of my favourite holiday photos and used Craft Artist, to give them a sepia finish.
 
I used the gorgeous papers from Tim's Correspondence, paper stash.
As a finishing touch, I added some stamping to the tags and bits and pieces inside the album. I'm really quite pleased with the finished results. I had a lot of fun making the album and one of the joys was sorting through some of my old photos. They certainly do bring back lovely memories of some very Happy Holidays ! x

Saturday, 27 June 2015

Twelve Tags of 2015 ~June

Don't you just love those afternoons when you can escape to your crafty space and loose yourself for a few hours?  Well that's what I've been up to today. My session started with getting down to work on my offering for Tim's Twelve Tags of 2015 challenge. You can see Tim's lovely tag here. I was puzzling over what to use as I haven't got Tim's 'Fresh Brewed' die.  A little trip to the 'Crafty Bunch' craft shop yesterday, however, meant that I had got this newly acquired  Sizzix 'Birds' die.I really love it and I think it's worked a treat ! I've tried to maintain the essence of Tim's tag, by using the same techniques as well as  a variety of textures and similar colours. So now I am going back to my craft room to continue with another project, which I shall be sharing later on this week. Thank you Tim for continuing to inspire us all ! x

Friday, 19 June 2015

Etched Metal Books and The Joys of Internet Learning.

I'm not sure how many of my blog friends are familiar with the 'Interweave' website. I'ts basically an online store, that has a huge collection of craft resources. As well as providing information about crafting events and communities, it also stocks books magazines dvd's and digital downloads, on just about any type of craft or artistic pursuit you can imagine. It was here that I came across the work of Jen Crossley. I loved the look of her metal covered books, and decided to buy a digital download of her Etched Metal Book class and couldn't wait to get started on a project. Jen  has a blog called A Mark in Time  and you can see some of her beautiful work over there. 
This is the first book I made after following the Etched Metal Book class. Out of fairness to Jen I won't go into detail about the process but it does involve stamping and you may recognize the Tim Holtz Bookplate stamp that I've used here.The equipment needed was easy to get hold of, I bought the etching fluid from our local Maplins and brass sheet can be bought in several places on the internet. I borrowed a few tools from my husband and was soon up and running.The whole process is like magic ! I found it really fascinating. As suggested by Jen, the book is filled with water colour paper and is really nice to handle. It was the first time I'd had a go at binding a book and Jen's instructions on the video were easy to follow. After this 'trial run', I had to get straight on to the next book as I had so many ideas buzzing around my head!
So here is book number two. This time I did some masking and stamping to create the design.The anthropomorphic stamps I used, are by Katzelkraft. There is also a bit of freehand Sharpie going on around the frame too. This book has now been given away as a wedding present. Unfortunately, I didn't photograph the inside but each of the water colour signatures, have been wrapped in papers from Tim Holtz's Wallflower collection, very pretty they are too ! I believe the happy couple were very happy with their present !
 Here's a view of some of the dingle dangles,  many of which, have been salvaged from charity shop  jewellery. I buy up old bracelets and necklaces, if they have glass or metal beads and are cheap! If you love learning something new, I can highly recommend hopping over and having a browse through the resources at Interweave. there are frequent special offers, and some freebies. The beauty of the digital downloads is the immediacy, no waiting for the postman to arrive ! I'd like to say thank you to Jen Crossley for teaching me, through the magic of the internet, a fabulous new skill.

Thursday, 4 June 2015

Small is Beautiful ~ Stamps and Stencils ~ New Challenge


It's time for a new challenge over at Stamps and Stencils. We've really enjoyed seeing all the entries for last month's 'Three of a Kind' challenge and I for one, can't wait to see what you come up with this time around. Julia is our host this month and this is what she has to say......

For this month's challenge you are asked to make or alter something small.This could be a tiny book or journal, an ATC or ATB, a small canvas or box/tin of similar size, a small piece of jewelry - anything, as long as it is small. you must use at least one stamp and one stencil on your project. Please remember we are a mixed media challenge blog and the style of your work should reflect this.

My project consists of these two mini canvasses decorated in a Steam punk style. Each canvas measures around 70 mm square or 2 3/4 inches. It's strange, but I find that a small surface can be almost as daunting as a large canvas ! 
My starting point for each canvas was to partially cover the surface with book pages. I then stamped the images onto a piece of Deli Paper and adhered them to the surface with matte Glue and Seal. I usually use tissue paper for this technique, but my dear friend Sandy, brought me a box of Deli Paper back from her trip to New York and I was keen to try it out. So far so good ! It's more robust than tissue so it's much easier to handle.
I used Distress Markers and a water brush, to add a little colour to the face, I then set too with embellishing, using some watch parts that I've been hoarding for a long time ! The stamps I've used on each canvas are by La Blanche. I have amassed  a pretty big collection of  stamps and it's been great to get out some of the ones I love but haven't used enough !
Here's number 2. The stenciling has been done with Wendy Vecchi's Crackle Embossing Paste through a Tim Holtz' Typography Layering Stencil. I decided to add some faux gold leaf onto the surface of the letters, 'cause I love a bit of bling ! I couldn't resist adding some coiled rusty wire to create a little hanger.
So now it's over to you ! hop over to the Stamps and Stencils blog where you'll find some fantastic inspiration from Julia the rest of the design team. Don't forget to take a look at the blog next Tuesday where the winners of the last challenge will be announced. I shall also be using 'Mr Random Organiser', to select a winning entry for the palette knife. I will post the name both here and on the Stamps and Stencils blog. So, until next time... happy crafting ! x

Sunday, 31 May 2015

Twelve Tags of 2015 ~ May

Phew ! last day of the month and I've just managed to finish my tag for Tim's Twelve Tags of 2015 Challenge. I love all the different elements Tim has used on this month's tag, you can see his fabulous piece by following this link. I've followed his design quite closely and just substituted a few things for those products that I've yet to acquire. I was very happy to get my hands on the  Sizzix Tiny Tattered Florals dies, from the lovely folks at Craft Obsessions. Once I started quilling these gorgeous little flowers, I couldn't stop ! I've now got a whole bunch of them waiting for future projects. Once again another month has flown by and it's hard to believe that tomorrow, we will be half way through the year Eeeeeek ! Many thanks to Tim for another great tag  x

Thursday, 7 May 2015

Three of a Kind ~ Stamps and Stencils ~ New Challenge.

It's time for our 2nd  challenge over at Stamps and Stencils but before I tell you more about this, I'd like to just thank every single person who took the time to upload a project for our 'Any Thing Goes' challenge and helped to make the launch of Stamps and Stencils, such a resounding success ! We had a whopping 135 entries. Make sure you tune in next Tuesday to see our winners post.

Ruth is our host this month and she has chosen 'Three of a Kind'. This is what Ruth has to say about the challenge......

'What we'd like to see is 3 of the same sort of focal element on a project so we don't just mean 3 buttons or small embellishments, it could be 3 flowers, 3 figures, 3 inspirational quotes....or thinking wider, if you're feeling adventurous you could do 3 ATC's, a trio of ATB's or maybe a triptych.'
  
I think you'll agree there's plenty of scope there ! So please, let your imagination run wild and show us your 'Three of a kind'. You can see Ruth's fabulous project as well as plenty of luscious inspiration from the rest of the design team over on the Stamps and Stencils blog

I've put together this mixed media panel, utilizing a piece of corrugated card as my substrate. I've used embossing paste through stencils by Tim Holtz and Creative Expressions, in the background......
I added more texture by sprinkling Creative Expressions Micro Beads onto matte gel.
Really love this technique ! Once everything was dry, I painted the surface with Distress Paint in a mixture of Antique Linen and Frayed Burlap. I then used Vintage Photo Spray to add 'depth' to the stenciling and after more drying time, I highlighted the stenciling and glass beads with Treasure Gold Paste in Spanish Topaz, Aquamarine and White Fire.
The three hearts are made of card, with embossed foil wings. The surfaces have been treated with Wendy Vecchi's Faux Granite Ware technique. This is great fun to do and if you haven't already tried it., you can find full details on Wendy's blog with this link A few embellishments, some faux rust finished cogs and a doodle of rusty wire around the edge, complete the panel.
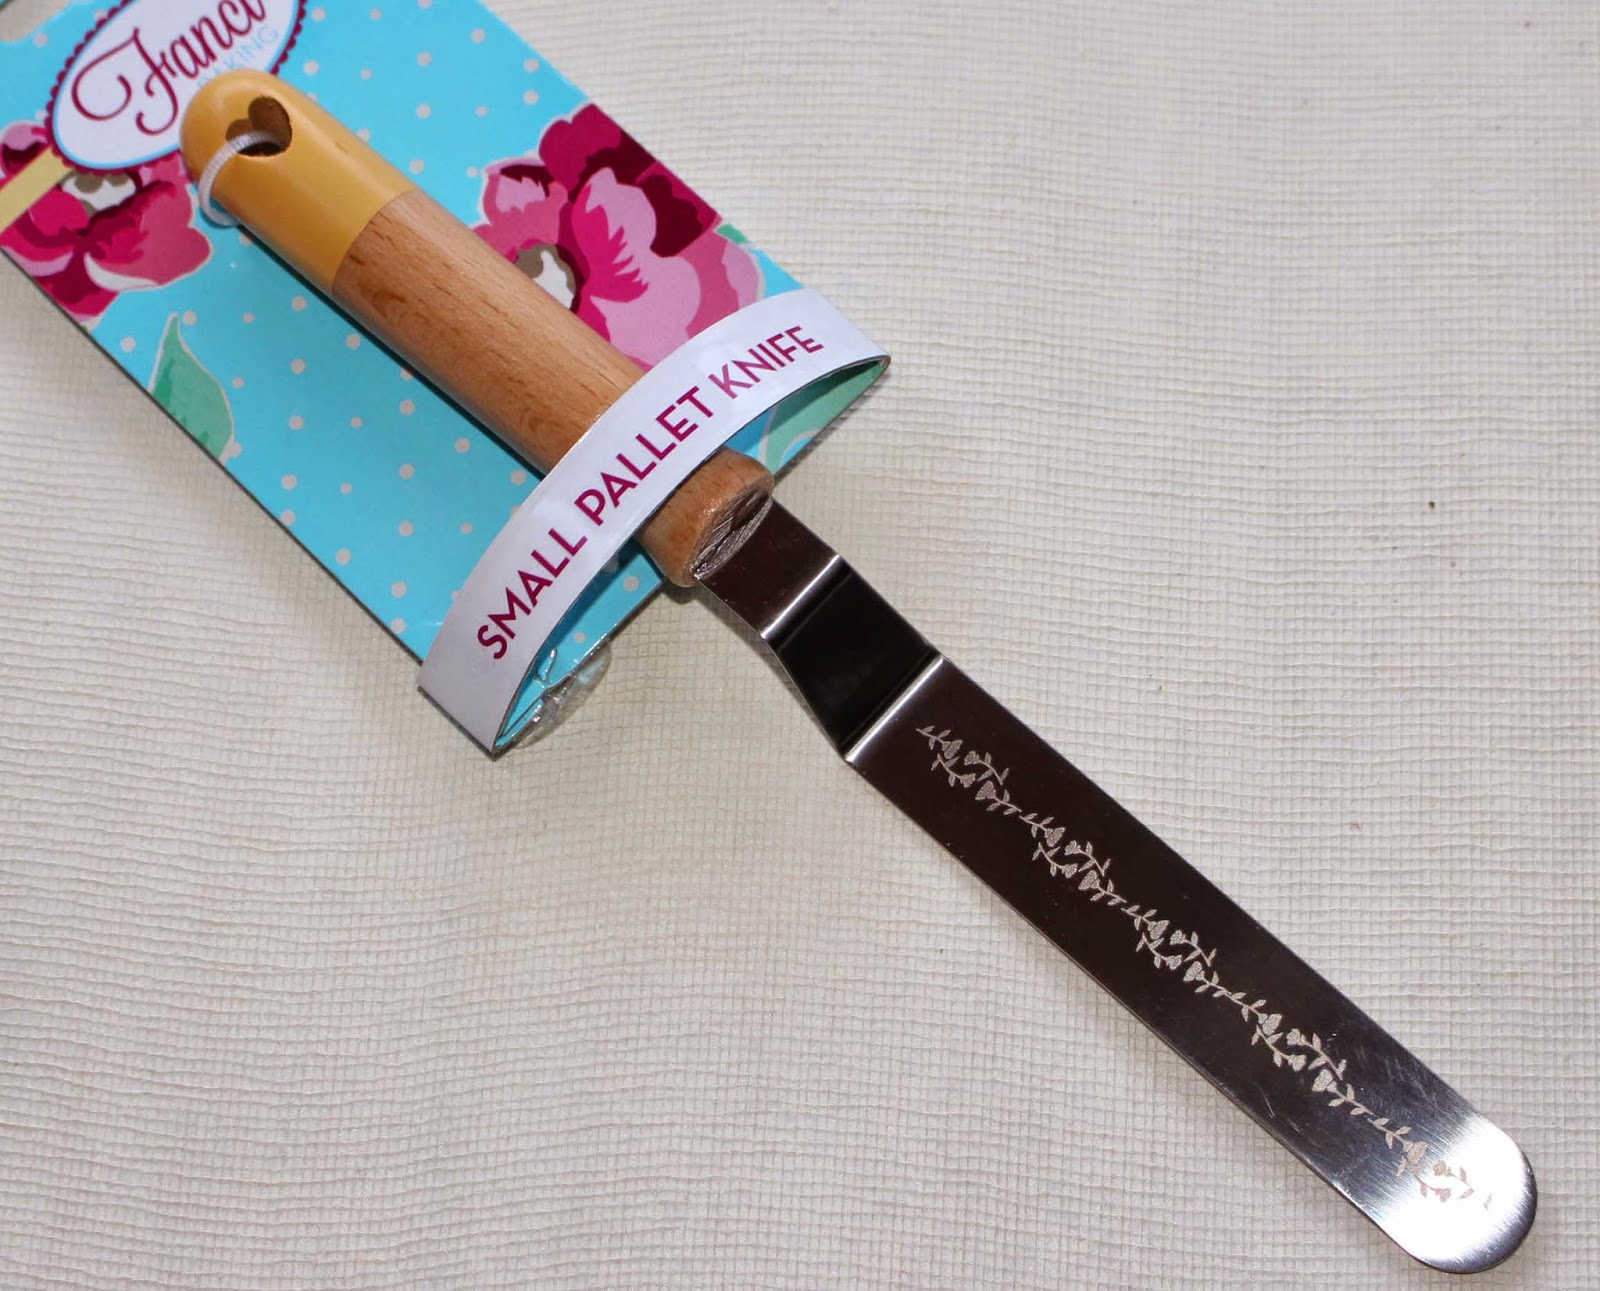
Now, as a little treat for one lucky person, I will be giving away this handy little palette knife for one of the entries, chosen at random, for this month's Three of a Kind Challenge. I discovered these in my local Debenhams store. They're actually used for decorating cakes, but I've found mine to be the perfect tool for applying a layer of 'streak free' embossing paste. The winner will be announced both here and on the Stamps and Stencils blog, at the end of the challenge. 
All that remains is for you to go and get crafting and share your 'Three of a Kind' projects with us over at Stamps and Stencils. You'll find full details and the challenge rules over on the blog. Happy Days everyone ! x

Sunday, 19 April 2015

Twelve Tags of 2015 ~ April

Ha ha ! It's only April 19th and I'm posting my Tim Tag for his Twelve Tags of 2015 Challenge. This is positively early for me! This was yet another fun tag to make, I'm really not sure how Tim keeps coming up with these unique ideas every month. Although I've stuck closely to Tim's original tag, which you can see here, I had to do a fair bit of improvising and that was great because I was able to use my stuff ! Firstly I cut the tag using Kraft card and my Tag and Book Plate die. I haven't got the lovely Adventures Word Blocks dies, but I have got the Holiday Words block dies from last Christmas. There were actually several words I could have used from this set but I decided on using the word 'Earth'. Luckily for me I have got Tim's beautiful Flower Garden stamps. I went for a vintage look by stamping on some rust spots using a stamp from my 'most inked set' of Bitty Grunge stamps. I used my Pazzles machine to die cut the word 'beautiful' and just as I was threading the dyed seam binding through the tag, I glanced down on my rather messy craft table and in a little container of bits and bobs, I noticed a Dymo label with the word 'Mother' on it. The perfect finishing touch, 'Beautiful Mother Earth' Too right ! Thanks Tim, with this tag I feel that I've made the 'most out of my products' x

Thursday, 9 April 2015

Just a Peek !

Hi everybody I have a new post over on the Stamps and Stencils blog today. As part of what we want to do on the new challenge blog, the design team will be taking it in turns to share what we are calling an 'Inspirational Post'. These posts may be about a specific technique, a product or maybe just a project one of us would like to share with you all. We are absolutely thrilled by the response we have had to the Stamps and Stencils first challenge, there are so many fabulous entries and we are not even half way through the month! Thank you all so very much .
Now,  here's a sneaky peek from the first of our Inspirational Posts, which I am honoured to present to you today. I hope you'll find some time to hop over to the blog and take a look. I should grab a cuppa and a comfy seat first though ! x

Thursday, 2 April 2015

Stamps and Stencils ~ Launch day ~ Anything Goes!

Greetings everybody ! The day has finally arrived for the Launch of our new Stamps and Stencils challenge blog.We have the very lovely and talented Sue Carrington to thank for for taking the initiative in coming up with the idea and  putting the blog together. I certainly hope you'll hop over and take a look. We are a monthly, mixed media challenge blog and as the name suggests, we are all about Stamps and Stencils. I think you'll agree these are staples in any crafter's toolkit.  Our first challenge is an 'Anything Goes' and we would love to see what you come up with using stamps, stencils or both ! There's some fabulous inspiration over on the new blog, which you can easily find with this link.
For my contribution, I've made a mixed media canvas with lots of yummy Distress Paint and stencilled embossing paste. I was very fortunate to visit Marrakesh last year and brought back some lovely vintage style postcards which I've been saving to use in a project. As I was going through my stencils, I found one that was perfect for a Moroccan styled piece. I used the fabulous embossing paste technique used by Tim Holtz on his March tag to create the background for this beautiful group of musicians.
As with most of the canvasses I make, I covered the background with various book pages, I think it's psychological, getting rid of the blank space! I then painted on some vibrant Distress Paint colours and allowed the colours to marble together, with a little help from a water spray. The new colours that Tim has introduced are exactly the colours you see everywhere in Marrakesh. Many of the buildings are the colour of Abandoned Coral, with paint work in Mermaid Lagoon and Cracked Psitachio, Quite uncanny, I wonder if Tim's been over there, Ha ha !
I used one of Tim's Damask stamps, with Archival ink and stamped onto a tissue.
I applied this to the canvas using lots of Matte Glue and Seal. I also applied embossing paste through the stencil and while the paste was still wet, heat embossed with gold and blue embossing powder. and heated to activate. I just love the effect this gives!
To make the damask patterns stand out a little more, I doodled around them with a gold pen. I also added some stamping with a French script stamp. Instead of using the original postcard, I scanned it to my computer and printed it to a size which just fitted inside the oval shape I'd already die cut in an embossed Cameo Frame, which had been in my 'unfinished stash'. I find that it's always worth looking through my unfinished  stash  when I'm  piecing something together, I often find something that's just right. After mounting the framed picture on dimensional pads, I used a Stabilo black pencil and water brush to add a little shadow underneath the frame. It just adds a little bit of depth. The flower are Ideaology metal ones which, i painted with Distress Paints, I love that faux enamel look.
So there you have it! my first post for the new Stamps and Stencils blog, I hope you've enjoyed it. I look forward to seeing you over there. Come on! dust off those Stamps and Stencils and let us see your fabulous creations ! Full details of how to join in are over on the Stamps and Stencils blog. x