Wednesday, 29 May 2013

WOYWW # 208 4th Anniversary!


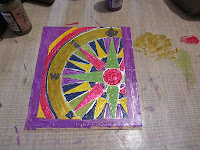
Happy 4th Anniversary WOYWW'ers! Well it's finally here the 4th anniversary of the biggest snoop into crafters' work spaces on the wonderful world wide web. If you haven't  a clue of what I'm on about, hop over to the amazing Julia and her Stamping Ground Blog and all will be revealed. May I say a very big thank you to Julia for being an brilliant hostes,s who has managed to fit this weekly post into her busy life, every Wednesday  for the last 4 years ! I'd say that's pretty good going. We are celebrating this milestone with an ATC swap for anyone that wants to get involved.There's no pressure it's not compulsory! So have a nose around my table and see what you can see. Oh is that a newly arrived parcel? and  What is she going to do with those leaves? I hear you ask. Maybe you can guess what's in the parcel and you'll just have to come back and see what I do with the leaves.  Have a happy 4th Anniversary WOYWW, and I'm up for an ATC swap  for anyone that wants to. Now let me go and open that parcel.........X

Sunday, 26 May 2013

Simon Says Stamp and Show 'Favourite Ink'.

The challenge over at Simon Says Stamp and Show is asking us to show our 'favourite ink'. So unfair! How can any paper crafter choose just one favourite ink! Well I've pondered about this for a few days and come to the conclusion that there are inks that you just cannot live without and for me these would be Jet Black Archival, and the whole range of browns in Distress Ink, from antique Linen to Walnut stain. So they are just a given but the ink that first captured my heart at the very beginning of my stamping adventure, is good old clear embossing ink. With clear embossing ink and clear embossing powder, it doesn't matter what colour surface you choose to stamp on or what colour ink you blend in afterwards, you always have that magical resist shining through. So I'm sharing my journal cover which I completed a while ago, it's nice and clean as I usually have a plastic slip cover over it. It's very simply done, just stamped with clear embossing ink, over the top of a printed picture of birds and grasses, and then heat embossed with clear embossing powder. I then blended in several colours of Distress Ink,enabling the stamping to shine through.
 This is the back cover, done in just the same way. Both pages were done in a purely experimental way, so the stamping is pretty random. The images were down loaded from The Graphics Fairy and printed onto A4 sized white card. I just really like the results and when I use this technique on cards for  my none crafty friends, they always ask 'how did you do that?' It's just a little bit of crafty magic! So this time around, I'm choosing Clear Embossing ink as my favourite. The generous people over at Simon Says Stamp have sponsored the challenge and one lucky person drawn at random, will win a very cool $50 to spend in their shop.So why not share your favourite ink.x

Thursday, 23 May 2013

Twelve Tags Of 2013 May

Time for another contribution to the Tim Holtz Twelve Tags of 2013 challenge. I can hardly believe how quickly time is flying past this year! As usual Tim has come up with another great tag for this month, and has given us the opportunity to have a go at using the new Remnant Rub Ons. I must say I really like the way they resist the ink. I made two tags but have chosen this one as I think I've positioned it better. I've used a few improvisations such as stamping the film strip onto acetate and making my own 'enamelled' token. For this I used a blank pendant baseand made a white  Fimo centre. After baking it I added the Remnant Rub Ons and a little alcohol ink on the edges, before covering with a layer of Glossy Accents. I shall certainly be doing this again as I really like the way it turned out. Although I have Tim's Mona Lisa stamp, I decided to go with this phrenology head stamp, partly because I love it so much and also because I've recently completed another project using lots of Mona Images. You can see that here. So that's it for now, I'm looking forward to seeing what Tim has in store for June. x

Wednesday, 22 May 2013

WOYWW #207

Well here I am on my second cup of tea since I got in from work, just starting to 'chillax' (....... I know its a corny word, but it just describes my current state!) So just time for a quick WOYWW before getting down to some cooking. What is WOYWW, well if you don't know by now hop over to Julia's Stamping Ground blog and take a look. Make it snappy though, as next week is the fourth anniversary of this wonderful online snoop into the workspaces of crafters from around the world.  There is a planned ATC swop and the last one was a lot of fun. If you think you'd like to reveal your workspace to the world follow the link here, and get involved. As you can see I've been pretty busy, at this point I must apologise for the lack of my visiting as I've  had some recent work and crafting commitments that have kept me super busy, I will try and do better this week. So dive in and have a poke around at some of the things I've been up to. So happy WOYWWeverybody and see you next week for the 4th anniversary edition. x

Friday, 17 May 2013

'Enamelled Metal' Travel Journal.


Here is the project I've been working on for my design team post over at the eclectic Paperie blog.If you've not visited there yet, you can scroll down and see my piece for the current eP Team Picks Challenge, or follow my link which will take you straight there. There's always plenty of inspiration to be found on the eP blog from a very talented team of ladies! The promise of summer holidays on the not too distant horizon, has got me thinking. I always like to take a sketch book with me when I go away and have a little dabble with my pens and paints. The variety of journals and 'smash' books with all their pockets and different papers has made my plain old sketch book seem a little uninspiring so I've decided to make myself  something a bit more interesting. I've used Tim Holtz's 'enamelled metals' technique for the cover and the pages are made from off cuts of paper. I've made it nice and thick with different weights of paper and card, so that can stick bits in, draw, paint or write to my heart's content. I started off by embossing some metal foil tape using the Compass embossing folder from the Alterations Airmail and Compass Set. I attached this to a piece of card, this is how it looked.
I then painted it with a variety of Distress Paints and left it to dry completely. It looks a bit messy at this stage, but fear not! The magic happens when you start to sand it.
Using a sanding grip, I lightly sanded the surface removing some of the paint from the raised pattern. I really like this part, as it starts to come to life.
The next stage involves going over the surface with a blending tool and distress ink. I've used a mixture of Vintage Photo and Walnut stain. I then heat embossed it with clear embossing powder.
I cut a frame from a separate piece of card and used the same enamelled metal technique but this time using the 'ledger' Texture Fades embossing folder and just two colours. I treated the back cover in the same way.
 I've used my 'Bind it all' machine to assemble the journal and added a couple of embellishments. I particularly like the little wooden tag. Kim sent me these Maya Road tags in my DT package and I've been itching to use them. Although I've stamped the inside front and back covers, I want to do a bit of stamping and embellishing inside the journal before I use.
So roll on summer.......... now where did I put those holiday brochures..........x

Here's a list of supplies I've used available from the lovely eP store.

 >

Thursday, 16 May 2013

Mona,Tim and Dyan Meet Andy and Toni

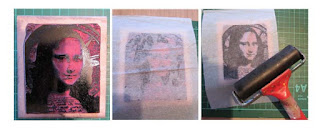
Its time for another ePicks Challenge over at the eclectic Paperie blog. The host for this month is Julie and she's asking for us to use 'Gel Medium' in a project. You can see Julie's work here, as well as her fabulous video tutorial showing how to use gel medium to transfer an image to paper. I've chosen to create this Warhol inspired 10 by 12 inch canvas using Studio Gel Medium to adhere  stamped and sprayed tissue onto the surface. I started off by stamping onto pieces of white tissue paper with Tim Holtz's Mona Lisa stamp and black Staz On ink. I discovered that to get the best impression, it was better to lay the tissue on top of the inked stamp and gently brayer the surface.
This gave a nice dark print. I then sprayed each image with Dylusions Ink, in as many yummy colours as I have. I trimmed the images and played about with the arrangement of colours placing the images on my canvas which I'd previously coated with white gesso.
After stacking the images in order, I started to adhere them, one by one, to the canvas using matte Studio Multi Medium. once they were all stuck down I gave the whole surface a coat of Multi Medium, taking care not to over brush the surface in order to avoid any colour transfer, as the Dylusions Sprays are water soluble. Once the canvas was dry, I used some of the new Tim Holtz Remnant  Rub Ons Numbers to embellish the surface. I can't get enough of these, they went onto the surface so easily. 
I finally gave the canvas another coat of gel medium. Once dry, I added a wire hanger and a little Ideaology Token that says 'Altered' which I think just about sums it up. So now its over to you. Hop over to the eclectic Paperie blog where you'll find lots of inspiration from the design team. as well as guidelines for the challenge. You don't have to use products from the eP shop but we love it when you do. You may even win a prize that will help you stock up with some goods.
 Here is a list of the products I've used on this project which are available from the eP shop. 

Wednesday, 15 May 2013

WOYWW #206

 It's a rather wet and dismal morning here and I should be getting ready for work but just wanted to post a quick picture of my chaotic desk as it remains after an afternoon of crafting. Why am I showing this chaos to the world? because it's time for the 206th episode of Whats On Your Work(desk/space) Wednesday or WOYWW as it is known throughout the world. It's hosted by the lovely Julia over at her Stamping Ground blog so nip over there and join in the fun. I've been working on a couple of projects to be blogged later so there's lots of stuff on my table. I should at this point say that the table is about 7ft long and the rest of it is similarly covered. Well I like a bit of creative chaos. Happy WOYWW everyone x

Sunday, 12 May 2013

The Magnificent 6

Here's a tag I've made using a photo-realistic stamp from the Stampsmith African American Heritage set. I love this group of youngsters proudly posing in their sports kits with one of them holding a football. The background of the tag has been stamped in various shades of brown distress ink using the Tim Holtz 'Bitty Grunge' stamp set. This has then been toned down with white Distress Stain and once dry, Antique Linen Distress ink blended over the top with Vintage Photo and Walnut Stain applied around the edges. I then die cut the tag with an Alterations Clip Board die, I coloured this with Tarnished Brass Distress Paint. The photo of the boys has been stamped with black Archival ink. Once dry, I covered the surface with Versa Mark Ink and clear embossing powder. I think this makes it look more like a glossy photograph.
 A bit of scrunching up and a touch of Vintage Photo DI enhances the vintage look. I've added a metal number, a newspaper cutting from the sports section of our local paper, plus a couple of stamped tickets cut using the new mini tickets die and a stamped and die cut postage stamp. These are the mementos of the day depicted in the 'photo'. I'm entering this into the Stampsmith 'Tic Tac Toe' challenge as well as I've chosen the bottom row which is 'Manly, Metal and Distress'. I'm also entering it into the Our Creative Corner and Fashionable Stamping Challenges which are both holding an 'Anything Goes' challenge. x