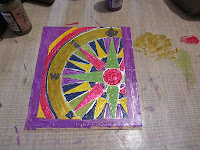
Here is the project I've been working on for my design team post over at the eclectic Paperie blog.If you've not visited there yet, you can scroll down and see my piece for the current eP Team Picks Challenge, or follow my link which will take you straight there. There's always plenty of inspiration to be found on the eP blog from a very talented team of ladies! The promise of summer holidays on the not too distant horizon, has got me thinking. I always like to take a sketch book with me when I go away and have a little dabble with my pens and paints. The variety of journals and 'smash' books with all their pockets and different papers has made my plain old sketch book seem a little uninspiring so I've decided to make myself something a bit more interesting. I've used Tim Holtz's 'enamelled metals' technique for the cover and the pages are made from off cuts of paper. I've made it nice and thick with different weights of paper and card, so that can stick bits in, draw, paint or write to my heart's content. I started off by embossing some metal foil tape using the Compass embossing folder from the Alterations Airmail and Compass Set. I attached this to a piece of card, this is how it looked.
I then painted it with a variety of Distress Paints and left it to dry completely. It looks a bit messy at this stage, but fear not! The magic happens when you start to sand it.
Using a sanding grip, I lightly sanded the surface removing some of the paint from the raised pattern. I really like this part, as it starts to come to life.
The next stage involves going over the surface with a blending tool and distress ink. I've used a mixture of Vintage Photo and Walnut stain. I then heat embossed it with clear embossing powder.
I cut a frame from a separate piece of card and used the same enamelled metal technique but this time using the 'ledger' Texture Fades embossing folder and just two colours. I treated the back cover in the same way.
I've used my 'Bind it all' machine to assemble the journal and added a couple of embellishments. I particularly like the little wooden tag. Kim sent me these Maya Road tags in my DT package and I've been itching to use them. Although I've stamped the inside front and back covers, I want to do a bit of stamping and embellishing inside the journal before I use.
So roll on summer.......... now where did I put those holiday brochures..........x
Here's a list of supplies I've used available from the lovely eP store.


Love your book, what a great technique.
ReplyDeleteWow what a cover! The colored metal is fabulous...great embossing plate!
ReplyDeleteWow Toni, your book cover is stunning! Love how you mixed up the colours and made them look fabulous. Those paints are just wonderful..... Hugs, Anne x
ReplyDeleteSummer? We had it one day last week! As for your journal, wow, this is inspiring, we're about to start decorating our own Smash type book and really love how cheerful you've made yours.
ReplyDeleteO my word... What a fabulous book cover, the design is amazing...Love the texture the coloured metal effect gives... Brillant work! Hugs May x x x
ReplyDelete